Fermentation: How
Yeast Obtain Energy
In this lab, we will be studying the process of fermentation
as a source of energy for cells, specifically yeast cells, and will relate
this to everyday life by making lab brew. This process, and the steps
that are needed to prevent the brew from turning to vinegar also
illustrate one of the classic principles in the field of microbiology.
Yeast Cells Do Alcohol Fermentation
Many microorganisms (micro = small), notably yeasts
and bacteria, extract energy from their food (glucose) by fermentation. One
of the best-known types of fermentation is alcohol fermentation in which
the overall chemical reaction is:
C6H12O6 (glucose) → 2CO2 + 2CH3CH2OH (ethyl alcohol)
or, starting from sucrose or maltose,
C12H22O11 + H2O → 4CO2 + 4CH3CH2OH (ethyl alcohol)
Humans have known about and utilized the process of
fermentation for many thousands of years. CO2 liberated by yeast
cells doing alcohol fermentation causes bread to rise, while the liberated
alcohol gives it its wonderful smell. The Egyptians and many subsequent
civilizations have fermented grains such as barley (or wheat but note that
both are off-limits for someone with a gluten
sensitivity) to break the starch down to malt (maltose), then glucose, and
finally alcohol. Since pretty-much the same ingredients go into bread and
beer, in the past, beer has actually been referred to as liquid bread.
For about the same length of time, people have also known that
various fruits, especially grapes, could also be fermented to produce
alcoholic beverages. Thus, alcoholic fermentation is the process which is
responsible for the production of wine, beer, and other fermented products.
It is the toxic nature of ethanol which acts to preserve these brews, and
which leads to intoxication upon consumption. In fact, yeasts cannot
generally survive in alcohol concentrations in excess of approximately 12 to
14%.
In this lab, we will be studying the process of alcohol
fermentation as performed by the yeast, Saccharomyces cerevisiae
(sacchar = sugar; myces = fungus; Ceres = goddess of
grain; vis = to see; -ia = state of, condition of, disease).
It was this process of alcohol fermentation which Louis
Pasteur studied, leading to a biochemical understanding of biological
processes.
Within the yeast cells, the actual chemical reactions that
turn sugar into alcohol are catalyzed by a number of enzymes
(en = in; zym = yeast) biological catalysts that help other
chemicals to react. Although numerous enzymes are found in living organisms,
each one with its own specialized function, the very first such chemicals to
be studied were those in yeast which are involved in the process of
fermentation. Since they were found in yeast, they were called enzymes.
We now know of many more enzymes, most of which are not found in yeast, yet
the name is still used.
Stoichiometry of Fermentation
Todays lab can be used to demonstrate a number of important
principles relating to alcoholic fermentation including the stoichiometry
(the study of the definite proportions in which chemicals will interact with
each other stoichi = an element, metr = measure) of the
conversion of sugar to alcohol. The following conversion factors will be
important, here:
| Molecular Weight of Sucrose/Maltose | 342.17 g/m |
| Moles of EtOH per Mole of Sucrose/Maltose | 4 m |
| Molecular Weight of Ethanol | 46.05 g/m |
| Grams of EtOH per Mole of Sucrose/Maltose | 4 × 46.05 = 184.20 g |
| Grams of EtOH per Gram of Sucrose/Maltose | 184.20 ÷ 342.17 = 0.538 g |
| Density of Pure EtOH at 20° C | 0.789 g/mL |
| Density of Pure H2O at 20° C | 0.99823 g/mL |
| Weight of One Can of Malt Syrup | 1.5 kg (3.3 lb) |
| Percentage of Weight of Maltose in Malt Syrup* | 80% |
| Percentage of Weight of H2O in Malt Syrup* | 20% |
| Weight of 1 C of Granulated Sucrose | 213.97 g |
| Density of Malt Syrup§ | 1.426 g/mL |
*These
percentages were found on another Web site
This was weighed here in our lab
§This number was found on another Web site as 0.084 gal/lb, and since
0.084 gal
= 318.04 mL and 1 lb = 453.59 g,
therefore 453.59 g/318.04 mL = 1.426 g/mL
|
Putting all that together, if the fermentation reaction is 100%
efficient (which is rare for most biological reactions), for every gram
of sucrose or maltose that is put in, 0.538 g (= 0.682 mL) of ethanol should
be produced.
Thus, it would be of interest to examine the recipe(s) and calculate the
hypothetical stoichiometry involved.
For our lab brew, the amount of sugar going in depends on
which recipe will be followed. The original, Fankhauser recipe calls for
1¼ C of sucrose + ⅓ C of canned malt syrup per 1-gal batch.
For the sucrose in the original, Fankhauser recipe,
| 1.25 C sucrose | × | 213.97 g sucrose | × | 0.538 g EtOH | = | 35.97 g EtOH |
| 4 L of lab brew | 1 C sucrose | 1 g sucrose | L of lab brew |
and for the maltose,
| 0.33 C syrup | × | 236.64 mL syrup | × | 1.426 g syrup | × | 0.80 g maltose | × | 0.538 g EtOH |
| 4 L | 1 C syrup | 1 mL syrup | 1 g syrup | 1 g maltose |
| = | 11.98 g EtOH |
| L of lab brew |
which can be combined and converted to milliliters:
| 35.97 + 11.98 g EtOH | × | 1 mL EtOH | = | 59.51 mL EtOH | = 5.95% v/v |
| L of lab brew | 0.789 g EtOH | L of lab brew |
Alternatively, the lab brew may be made with
⅞ to 1 C of malt, and no added sucrose per 1-gal batch.
In that case, the calculations would be:
| 1 C syrup | × | 236.64 mL syrup | × | 1.426 g syrup | × | 0.80 g maltose | × | 0.538 g EtOH |
| 4 L of lab brew | 1 C syrup | 1 mL syrup | 1 g syrup | 1 g maltose |
| = | 36.31 g EtOH |
| L of lab brew |
| 36.31 g EtOH | × | 1 mL EtOH | = | 46.02 mL EtOH | = 4.60% v/v |
| L of lab brew | 0.789 g EtOH | L of lab brew |
Interestingly, when weve tested the alcohol content of aged lab brew via
distillation and calculation of specific gravity or via refractive index,
we typically have obtained results in the vacinity of 5%. Thus, a) we know
were in the right ballpark, and b) this must be a fairly efficient chemical
reaction.
Calculating these numbers for the mead would require looking
up the density of honey and what percentage of it is actually sugar (also,
note that the sugar in honey is invert syrup a 50:50 mixture of glucose
and fructose). For the wine, in addition to the sucrose that is added, wed
need to know how much sugar is in the grapes.
Acetobacter Can Turn Alcohol into Vinegar

 Louis Pasteur was a famous French microbiologist who lived in the 1800s.
People involved in the wine industry of that day asked him to research why
some bottles of wine were OK while others spoiled and turned into vinegar
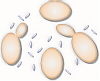
(vin = wine; aigre = sour). Pasteur discovered that the
whitish bloom on the skins of grapes contained a number of small, oval cells
which he identified as yeast. These are the yeast that turned the smashed
grapes into wine.
Louis Pasteur was a famous French microbiologist who lived in the 1800s.
People involved in the wine industry of that day asked him to research why
some bottles of wine were OK while others spoiled and turned into vinegar
(vin = wine; aigre = sour). Pasteur discovered that the
whitish bloom on the skins of grapes contained a number of small, oval cells
which he identified as yeast. These are the yeast that turned the smashed
grapes into wine.
In wine that had turned to vinegar, Pasteur also found small,
rod-shaped bacteria (this shape is called bacillus) as a
contamination or infection in the wine. These were found to belong to
the genus Acetobacter (aceto = vinegar; bacter = rod).
Pasteur discovered that if the wine was heated to 63° C and held at that
temperature for 30 min, the Acetobacter would be killed.
 This process
is named in his honor: pasteurization. Some people object to treating
wine in this way, claiming that the flavor is changed. Today, by law, all
wine sold in the United States must have sulfites added to kill anything
living in it (and some highly allergic humans).
This process
is named in his honor: pasteurization. Some people object to treating
wine in this way, claiming that the flavor is changed. Today, by law, all
wine sold in the United States must have sulfites added to kill anything
living in it (and some highly allergic humans).
There is, however, another way to inhibit growth of Acetobacter. It
has been discovered that while yeast do not need the
presence of oxygen (O2) to do fermentation (fermentation is an
anaerobic process), Acetobacter do need O2 to turn
tthe alcohol produced by the yeast into vinegar, more specifically acetic
acid (CH3COOH). Thus, if O2 can be eliminated, the
Acetobacter cannot grow. However, since the process of fermentation
is evolving CO2, the fermentation vessel cannot be sealed or it
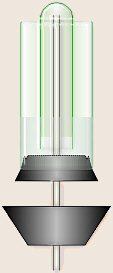
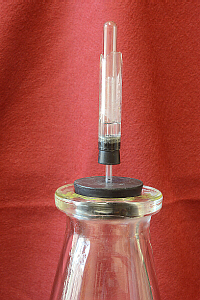
will explode. This necessitates the use of an airlock which allows
the CO2 produced to bubble out through a water barrier which
simultaneously prohibits O2 from entering. We will, therefore,
be making use of Pasteurs discoveries to keep our brew from turning into
malt vinegar.
Background on Hops or Other Added Herbs
For centuries, beer has been flavored by the addition of
various bitter herbs, for example, meadowsweet (Spiraea latifolia),
alehoof (which is another name for Gill-over-the-Ground, Glecoma
hederacea), and/or alecost or costmary (Chrysanthemum balsamita).
In the eleventh century, Bavarians started adding hops (Humulus lupulus)
to the brew to act as a preservative (it helps extend the shelf-life of the
beer) and to flavor the beer, as a replacement for the bitter herbs
previously used. This practice was borrowed by the British in the sixteenth
century.
 Modern breweries start with a cooked mash of sprouted barley
which is fermented by a special strain of yeast. Added to this is a
water-extract or tea from hops. For home-brewing, cans of barley malt
with (or without) hops extract added can be purchased to add to sugar water
to make beer. This is what we will use in this experiment.
Modern breweries start with a cooked mash of sprouted barley
which is fermented by a special strain of yeast. Added to this is a
water-extract or tea from hops. For home-brewing, cans of barley malt
with (or without) hops extract added can be purchased to add to sugar water
to make beer. This is what we will use in this experiment.
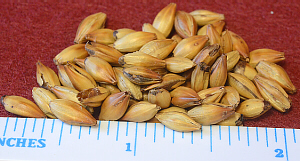
 A slight digression, but an interesting, related topic. While
the size of 1 in. is now defined in terms of the equivalent length in
millimeters, initially, way back in about 1066, an inch was defined as the
length of three barleycorns (grains of barley) end-to-end.
A slight digression, but an interesting, related topic. While
the size of 1 in. is now defined in terms of the equivalent length in
millimeters, initially, way back in about 1066, an inch was defined as the
length of three barleycorns (grains of barley) end-to-end.
 Hops (Humulus lupulus) is in the family Cannabinaceae (The plant in this
photo is another member of family Cannabinaceae.).
Its native habitat includes damp areas where it can be found twining tightly
around willow (and other) trees. Because of this, the Greek philosopher
Pliny called it lupus salictarius which means willow wolf.
Interestingly, apparently it always twines in a clockwise direction.
Humulus is a Medieval latinization of an Anglo-Saxon word, humule.
In the U. S. today, most hops are grown in Washington, Oregon, California,
and Idaho.
Hops (Humulus lupulus) is in the family Cannabinaceae (The plant in this
photo is another member of family Cannabinaceae.).
Its native habitat includes damp areas where it can be found twining tightly
around willow (and other) trees. Because of this, the Greek philosopher
Pliny called it lupus salictarius which means willow wolf.
Interestingly, apparently it always twines in a clockwise direction.
Humulus is a Medieval latinization of an Anglo-Saxon word, humule.
In the U. S. today, most hops are grown in Washington, Oregon, California,
and Idaho.
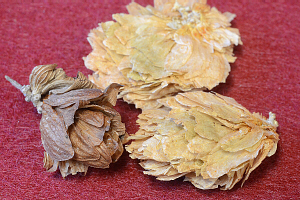 Like this other member of the Cannabinaceae, the part of the hops plant
that is used is the female strobilus (a part of the female plant
surrounding the flowers). This has also been used medicinally for centuries.
The primary constituents responsible for the medicinal properties and bitter
flavor are two chemicals called humulone and lupulone. These are unstable in
the presence of light and air, thus dried hops rapidly lose their flavor and
medicinal effectiveness (and must be used for brewing within a relatively
short time after harvest). Hops is a well-known sedative and has long been
used as a sleep aid. Animal and human research has shown that, indeed, it is
a CNS depressant. Hops is also used herbally as a diuretic and antibiotic.
Like this other member of the Cannabinaceae, the part of the hops plant
that is used is the female strobilus (a part of the female plant
surrounding the flowers). This has also been used medicinally for centuries.
The primary constituents responsible for the medicinal properties and bitter
flavor are two chemicals called humulone and lupulone. These are unstable in
the presence of light and air, thus dried hops rapidly lose their flavor and
medicinal effectiveness (and must be used for brewing within a relatively
short time after harvest). Hops is a well-known sedative and has long been
used as a sleep aid. Animal and human research has shown that, indeed, it is
a CNS depressant. Hops is also used herbally as a diuretic and antibiotic.
Supplies and Ingredients for One Gallon
Ingredients are listed for a 1-gal recipe
per lab section. Your class will need:
Needed for All Recipes
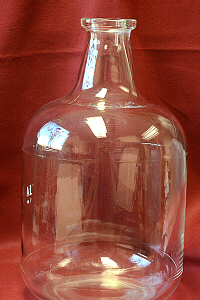
- one 1-gal. jug a clean, left-over, cider jug works well
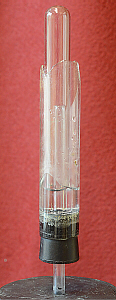
- airlock (made from rubber stoppers and glass tubing)
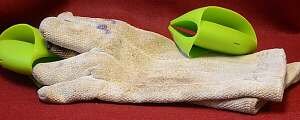
- hot pads, cooking pot(s), hot plate or stove,
measuring cup(s) and spoons, wooden spoon
- can opener or blender, depending on which recipe you will be making
- 2 CLEAN 2-liter soft-drink bottles with their plastic lids (If you
have some, please wash them thoroughly, let them air dry, and bring them in
when we are ready to bottle.)
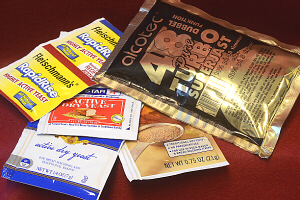
- 1 tsp live yeast (Brewers, ale, or wine yeast is preferable, but
regular baking yeast will work with a slightly different final product.)
- ¼ tsp table sugar (sucrose)
- ¼ C warm water
Recipe A1 Lab Brew
Additional ingredients are listed for Dr. Fankhausers
original recipe, scaled down to a 1-gal batch of lab brew.
- ⅓ C canned, hopped malt extract (When making a larger batch, we
have also used unhopped malt + a packet of dried hops, but because of the
way the hops are packaged, that would be difficult to do with a 1-gal.
batch. Both the malt and hops are available from a beer/wine supply
store.)
- 1¼ C white sucrose (⅓ to ½ C brown sugar may
be substituted for an equal amount of the white
for darker beer. Dextrose/glucose or maltose may also be substituted for
part/all of the sucrose or the ratio of malt extract to sugar may be increased.
- cool tap water: about 5 to 5½ C + ~ ½ gal. + more
Recipe A2 Lab Brew
The ingredients and procedure for this recipe are similar
to recipe A1, above, with one significant change:
- The sugar called for in the above recipe may totally be replaced by malt
extract. Thus about ⅞ to 1 C of malt extract would be used in place
of the amounts of malt and sugar listed above.
Recipe B Wine
- a bunch of grapes you may wish to weigh how many are used, and do
remember to record in your lab notebook what kind of grapes are used
- 1⅓ to 1½ C sugar
- cool tap water: about 5 to 5½ C + more
Recipe C Mead
This recipe was adapted from one published in Country
Commune Cooking by Lucy Horton.
- 3 C honey
- 1 oz (~3 to 4 in. long piece) fresh gingerroot, chopped
- 2 tsp whole cloves
- 2 tsp ground nutmeg or 1 whole nutmeg, smashed with a hammer
- cool tap water: about 5 to 5½ C + ~ ½ gal. + more
(Someone who tasted a batch of this mead commented that he
thought the spices were too strong. Were experimenting with decreasing
the amounts of the various spices.)
Procedure
For All Recipes
- So that we dont waste supplies, your class will make one of
the following recipes as a whole-class project.
Various people from the class are encouraged to volunteer to do different
parts of the procedure so everyone can be involved in some way.
Everyone should watch whats going on and take notes.
- Add 1 tsp yeast and ¼ tsp sugar to
about ¼ C water at about 37° C (warm but not hot).
Let the mixture sit for about 15 min to proof (while you continue with
other steps). It should, then, be bubbly or frothy. If nothing happens,
its dead, so youll need to try again.
Recipe A1 Lab Brew
- If not
already opened, open a can of malt extract and carefully remove
the label in such a way that it can be taped back on for identification.
In a pot, place a few inches of water and the can containing the malt
extract. Heat the can of malt until it can be poured.
- When
the malt is softened and can be poured/measured, in a separate pot, measure
and mix the ⅓ C hopped malt, the 1¼ C sucrose, and about 5 to 5½ C
water.
- Slowly
heat to boiling but do not let it boil over. Stir slowly to prevent burning.
Have hot pads ready to remove the pot from the heat if/when needed.
- Put a
little under ½ gal cold water into the jug, then add the hot sugar solution
with a funnel. Avoid running the hot solution down the sides of the jug or
it may crack from the heat.
 Pour some down the funnel directly into the cold water, then swirl to warm
the bottle.
Repeat the pour-and-swirl until all the hot liquid has been transferred.
Pour some down the funnel directly into the cold water, then swirl to warm
the bottle.
Repeat the pour-and-swirl until all the hot liquid has been transferred.
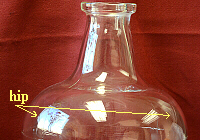
- Fill
the jug to the hip with cold water. In pharmaceutical jargon, one would
say, Q. s. to the hip, where q. s. stands for quantum
sufficit in Latin which means as much as suffices, as much as is
necessary. This final mixture is called the wort.
Recipe A2 Lab Brew
C-G. Follow recipe A1, except in step D, in place of the
malt extract plus sugar, use ⅞ C (= ¾ C + 2 T) of just malt (OK to round
to ~1 C).
Recipe B Wine
- In a
blender, grind a bunch of grapes (weigh first?) with about 5 to 5½ C of
water.
- Add
about 1⅓ to 1½ C sugar and blend to mix it all together.
- Note:
this mixture will not be cooked because the natural yeasts on the grape skins
aid the fermentation process, but would be killed by the heat.
F-G. Pour the mixture into the jug and q. s. to the
hip of the jug.
Recipe C Mead
- In a
pot, mix 3 C honey and 5 to 5½ C water. Slowly heat to boiling but do not
let it boil over. Stir slowly to prevent burning. Have hot pads ready to
remove the pot from the heat if/when needed.
- Add
1 oz (~3-4 in long piece) chopped, fresh gingerroot, 2 tsp whole cloves and
either 2 tsp ground nutmeg or 1 whole nutmeg that has been smashed with a
hammer.
- Boil
another 5 min, making sure it doesnt boil over.
- Put a
little under ½ gal cold water into the jug.
- Then,
add the hot sugar solution with a funnel. Avoid running the hot solution
down the sides of the jug or it may crack. Pour it down a funnel directly
into the cold water. Q. s. to the hip with cold water.
Then, for All Recipes
- Assuming
the yeast solution is bubbly, add it to the jug. This is called pitching
the wort, with pitching used here to refer to setting up something
(like pitching a tent) the wort is being set up to ferment. If the yeast
mixture is not bubbly, mix up a new batch (with different yeast). It is very
important to add all the cold water first, before adding the yeast, because
if the solution is too hot when the yeast is added it will kill the yeast.
- Place
an airlock on top of your bottle and add water to the correct level. This
will allow CO2 from the fermentation process to escape without
permitting entrance of outside air that contains O2 needed by
Acetobacter bacteria that could cause the wort to spoil or turn to
vinegar. Label the jug with the lab section, date, and contents (type of
malt, sugar, honey, grapes, and/or yeast.
- After
1 to 2 days (next lab period?), the beer should have a good head on it
(called the high kreusenen stage), or the wine or mead should be vigorously
bubbling. Check the airlock to make sure its water level is OK.
- After
about 4 days, the foam should subside, at which point, fill the jug up
to the bottom of the neck with water. In pharmaceutical jargon, one would say,
Q. s. to the neck, where q. s. stands for quantum sufficit
in Latin which means as much as suffices, as much as is necessary.
Replace the airlock. Note: depending on which days your lab meets, you
may be able to do this step as soon as the next lab period.
- After
about 8 to 10 days or so (may take longer if the room is cooler),
bubbling should have decreased to a very slow rate. Check the airlock to
make sure its water level is OK.
- About
two to three weeks after the brew was made, it will be ready for bottling.
In each of the CLEAN 2-L bottles (check to make sure they have their caps),
add 2 tsp. sugar using a funnel. Carefully decant pour off the
liquid or
supernatant
into a large, clean
beaker or bucket (Optionally, the brew may be siphoned into the beaker or
bucket), avoiding the sediment on the bottom, and from that container, pour
the brew into the bottles. If it foams up, you may need to partially-fill
the bottles, then come back to add more when the foam subsides. Assuming
youve been able to successfully decant the brew without leaving too much
behind with the sediment, it should work to divide the brew between the two
2-L bottles, leaving about 1½ inch of head-room in each bottle, so at the
end, you should look at how much is in each bottle and use the last of the
brew thats in the bucket to top off whichever appear to be a bit lower
than the other.
- Tightly cap the bottles and check for
leaks by gently squeezing each bottle. Store in a 60 to 70° F (16 to 21° C)
location for a minimum of 10 to 15 days to allow the residual yeast to
ferment the added sugar. This is what forms the carbonation in the beer (wine,
mead).
Note that if you bottle the beer (wine, mead) too soon and/or add too much sugar and/or
get too much of the yeast sediment into the bottles, too much CO2
may be formed and the bottle(s) may/will explode!
- As soon as possible, swirl the
sediment in the jug to loosen it and immediately and thoroughly wash out the
jug, making sure to scrub off any yeast stuck to it, then place it upside-down
in a sink or a rack to dry. Note that the yeast mixture is difficult to
impossible to remove once it has dried, so it is important to quickly and
thoroughly clean the jug.
- Again,
rinse out the carboy as soon as possible, before the left-over yeast dries.
The flavor improves with age, so it is recommended to age the beer (wine, mead)
for at least two weeks before consumption. Do not let the bottles freeze or
get too warm or they may explode. It is a good idea to store the bottles in
a location that will not be damaged if one does explode it does occasionally
happen.
- While
current University policy does not allow us to let you take any of this lab
brew home, if you later decide to make some on your own, after the beer (wine,
mead) has aged for at least two weeks, to
taste it, refrigerate the bottle upright for at least 12 hr. Do not shake or
disturb the sediment. When you open it, carefully decant it all into a pitcher
without stopping, so that the sediment is not stirred up, and avoid pouring
out the sediment when you get to the bottom. You may try to decant it into
glasses, but you must pour it all out and not stop midway, or the sediment
will be agitated. While the beer or wine may keep a bit longer, it is
recommended that the mead be consumed within a year or less.
Note that the left-over yeast, especially the strain used by
commercial breweries, is processed to remove some of the bitter flavor,
killed, and purified, then dried and sold as brewers yeast in the
health-food stores or used as a supplement in livestock feed. It is an
excellent source of the B vitamins and other nutrients. Since the yeast
in the sediment at the bottom of the jug and/or bottles is still alive, some
of it could, potentially, be used to ferment another batch of brew or to
make some bread.
Remember to Take Notes
Throughout the process, take notes on any information provided
by your instructor and on what, specificaly, your class did (including what
kind of malt, what kind of yeast, etc.). Make sure to record any deviations
from the written protocol (did you use a different type of sugar?). Make
sure to include all observations and data (you could even observe how many
bubbles per minute are coming through the airlock on various days as the
brew ferments). Draw pictures, especially of any new equipment (airlock),
and/or take notes where needed. Optionally, if available, a souvenir
piece of the yeast packet or piece of malt label (only if the can is empty
and the label no longer needed) may be included.
Optional, Related Activities
Go Visit a Brewery or Winery
As time and interest allow, you may wish to visit a local
brewery or winery to see how they make beer or wine. Take notes.
Are there any souvenirs that you could include in your lab notebook?
Bake Some Bread
 As time and interest allow, you may further study the process
of alcohol fermentation and production of CO2 by yeast by baking
a batch of bread at home. One possible, simple recipe is included here
(also adapted from Country Commune Cooking), but you
may have another personal favorite that you like to use.
As time and interest allow, you may further study the process
of alcohol fermentation and production of CO2 by yeast by baking
a batch of bread at home. One possible, simple recipe is included here
(also adapted from Country Commune Cooking), but you
may have another personal favorite that you like to use.
Supplies and Ingredients Needed
- ½ C honey
- 2 T or 2 pkg yeast
- 2 C warm (not hot) H2O
- whole wheat flour (approx. 6 C or so)
- ¼ C oil (safflower is highest in vitamin E, olive has a good taste,
others will work, too)
- big mixing bowl
- measuring cup(s) and spoons
- wooden spoon (and/or electric mixer)
- 2 loaf pans or cookie sheet (coated with oil and dusted with whole wheat
flour)
Procedure
- In a large bowl, mix the honey and
warm water. If the water
is too hot, it will kill the yeast. Warm tap water is OK.
- Sprinkle in the yeast and gently
stir to dissolve. Wait about 10 min to
make sure the yeast is alive: the mixture should start to get
frothy/foamy.
- Add the oil and 2 C of flour. Beat
approx. 1000 strokes by hand or for a
while with the electric mixer to develop the gluten, a protein that makes the
structure of the bread that holds in the CO2.
- Gradually, add approx. another 4 C of
flour. The dough should stick
together but not be too stiff. Optionally, you may add raisins, sunflower
seeds, chopped nuts, cinnamon, or chopped onion and various herbs such as
basil and sage, or whatever sounds like a good bread ingredient. You may
also substitute soy, rye, oat, or other flour or meal for 1 to 2 C of the
whole wheat flour.
- Knead the dough about 10 min until it
becomes elastic.
- Coat the dough lightly with oil and
place in an oiled bowl. Cover with a
damp (clean) cloth or kitchen towel (not terry cloth). Allow to rise in a
warm place (a gas oven thats turned off is good) for about one hour until
doubled in size.
- If not already done, coat the loaf
pans/cookie sheet with oil and dust
with flour.
- Punch down the dough (deflate it
somewhat), and form into two loaves.
Place into the loaf pans or form round loaves on the cookie sheet.
- Cover lightly with the towel and let
rise until double again (maybe
another hour although it shouldnt take as long this time).
- Bake at 350° F for about ½ to 1 hr
or until done (check it after ½ to ¾ hr).
Signs of doneness are a) if the sides have shrunken away from the pan and the
crust is browned and b) when you turn it out of the pan and tap on the bottom,
it sounds hollow. If not, put it back in the pan and back into the oven
for a while. Baking time may vary depending on a number of factors.
- Turn the bread out onto a wire rack
to cool. To keep for more than a day
or two, store in the refrigerator in a plastic bag. May be frozen.
Variations: You may add from 1 to 2 C up to not more than
half the total of a different kind(s) of flour. Unbleached white flour has
a lot less nutrients, so will make a lighter-colored, higher-rising bread
but lower in vitamins and fiber.
Rye bread can be made by adding up to half rye flour and some caraway seeds.
A couple tablespoons of unsweetened cocoa and instant coffee will make it
dark like pumpernickel (using molasses in place of honey will help darken it,
too). A cup of soy flour plus a cup of wheat germ will increase the protein
content of the bread. Instead of loaves, you could braid the bread by
forming three strands and braiding them (bake on cookie sheet). Dinner rolls
could be made by forming into small balls and baking on a cookie sheet or in
muffin tins (will not take as long to bake).
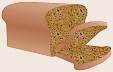
Cinnamon bread can be made by,
after punching down the dough, rolling or patting it out into two rectangles.
Each rectangle should then be sprinkled with powdered cinnamon, and optional
raisins and/or chopped nuts. Then, starting at one end, roll up the
rectangle to form a loaf, and place in a loaf pan to bake. After baking,
when the bread is sliced, the slices will have a spiral of cinnamon in
them.
Fankhauser Popcorn Seasoning
 In the distant past, a Biology lab tradition, after Friday volleyball, was
a taste of lab brew
accompanied by popcorn seasoned with Fankhauser popcorn seasoning.
As time allows, we may still be able to sample the popcorn.
In the distant past, a Biology lab tradition, after Friday volleyball, was
a taste of lab brew
accompanied by popcorn seasoned with Fankhauser popcorn seasoning.
As time allows, we may still be able to sample the popcorn.
Fankhauser Popcorn Seasoning Ingredients
- 4 T brewers yeast
- 2 T powdered kelp
- 1 T salt
Note: Larger batches may be made by using the same proportions
of ingredients (like 4 C + 2 C + 1 C, etc.).
Mix thoroughly (in blender if the yeast is in flakes). Store
in a tightly-sealed jar.
To Make a Batch of Popcorn
- Place about 10 mL (= 2 T, walnut-sized
piece)
of coconut oil into a heavy pot and place the pot on the largest burner on
the stove. Turn the burner on high.
- When the oil is melted and hot (a
corn kernel will sizzle), add 400 mL (= 1⅔ to 1¾ C) corn kernels and
cover. Shake until all the corn is popped.
- Pour the popped corn into a clean paper
grocery sack (with top turned over twice to stiffen it).
- While shaking the bag to stir and mix,
slowly drizzle on 30 to 40 mL (2 to 2¾ T) of a 1:1 butter/oil mixture (provides butter
flavor with less cholesterol). Then, dust with 30 to 40 mL of seasoning
mixture.
In this popcorn, the brewers yeast provides a number of the
B vitamins. Kelp provides iodine, needed by your thyroid gland. The kelp,
brewers yeast, and popcorn are complementary protein sources, thus form a
complete protein when combined. By mixing the butter 50:50 with vegetable
oil, it is possible to have the good buttery taste, yet reduce the amount of
cholesterol (cholesterol is found only in animal products, thus would be in
the butter, but not vegetable oil).
Things to Include in Your Notebook
Make sure you have all of the following in your lab notebook:
- all handout pages (in separate protocol book)
- all notes you take during the introductory mini-lecture
- all notes and data you gather as you perform the experiment, both
the day we mix the brew and the day we bottle it
- detailed drawing (yours!) of an airlock
- drawings of any other new equipment used and any other brewing
supplies used
- optional sample(s) of label from can of hops, yeast packet,
etc.
- answers to all discussion questions, a summary/conclusion in your
own words, and any suggestions you may have
- optionally, all notes and data you gather if you are able to visit
a brewery or winery or look up related information online
- optionally, all notes and data you gather if you make bread at
home
- any returned, graded pop quiz
Copyright © 2010 by J. Stein Carter. All rights reserved.
Based on printed protocol Copyright © 1982 D. B. Fankhauser
and © 1988 J. L. Stein Carter.
Chickadee photograph Copyright © by David B. Fankhauser
This page has been accessed  times since 18 Dec 2010.