Bunsen Burner Use and Safely Heating Test Tubes
Bunsen Burner Parts
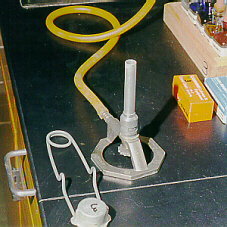 Learn these parts before you start. Draw a labeled picture of a
Bunsen burner.
Learn these parts before you start. Draw a labeled picture of a
Bunsen burner.
- desk stopcock
- mouth of barrel
- needle valve
- flint striker
- barrel
- burner nipple
- air intake holes
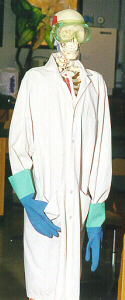
Personal Safety Gear
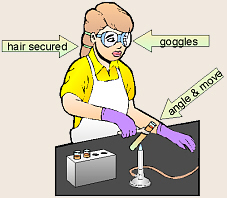 Take proper personal safety precautions:
- If your hair is long enough to pull back in a rubberband, then
its long enough that you must do so burnt hair stinks!
- Tuck in, fasten down, roll up, or in some other way secure any loose
clothing. The only accident weve ever had here was when a student caught a
baggy sleeve on fire.
- Be EXTREMELY ALERT and aware of exactly where every lit burner in the room
is. The color of a properly-adjusted flame is nearly invisible, thus very
dangerous.
Lighting the Burner
- Attach one end of a rubber hose to
the bench-top stopcock, and the other end to the burner nipple (if not
already attached).
- Confirm that the needle valve at the
base is gently closed (screw it in, clockwise remember, righty-tighty,
lefty-loosey). Get in the habit of not picking up the burner to
adjust the needle valve, because that could eventually result in catching
something on fire. Learn to adjust the needle valve with the burner sitting
on the benchtop.
- Practice using the flint striker:
Look into the cup, press the flint against the file and squeeze to strike.
If you dont get significant sparking, press the flint harder. If you still
get no spark, check to see that the flint is not worn out. (Dont waste the
flint by needlessly striking over and over...) Once you get good sparks,
move to the next step. Suggestion: often, trying to use the striker
right-handed just results in the flink passing by the file without creating
any sparks. Thus, try it left-handed so you can use your left thumb to
simultaneously press up and in. If that doesnt work well for you, try
holding the striker in your left hand and using both your left thumb and your
right hand to squeeze it. Do not turn the gas on until you can confidently
and predictably get a good spark!
- Open the bench stopcock by turning
the handle so that it is in line with the hose (it is off when it is at
right angles with the hose.) One common mistake that students make is to
turn the handle from off to on and keep going to the other side, which
turns it back off, again. Think of the stopcock as having a hole in it that
goes the same direction as the handle. Thus, if the handle is parallel
to the gas outlet, so is the hole inside, and the gas will flow. If the handle
is perpendicular (on either the right or the left side that doesnt matter),
the hole inside will be, too, so no gas can flow through it. Turn the
stopcock all the way on by aligning the handle parallel with the gas
outlet. Do not open the stopcock only partially as a means of
attempting to control the amount of gas going through thats the function
of the needle valve.
- With the flint striker handy, open
the needle valve slightly while listening at the mouth of the burner. When
you hear a slight hissing sound indicative that gas is flowing,
hold the striker just over the mouth of the burner, and strike it several
times until the gas lights. If you open the needle valve a sufficient amount
and do not hear hissing, that could mean that either the gas supply to the
room is shut off (ask your instructor to check the big green button) or
that there is a problem with that particular stopcock, and it has, thus, been
turned off.
- If there is gas coming out of your
burner, but youre having trouble lighting it, do not just stand there
letting a lot of gas out into the room! In that case, turn off the gas
turn off the bench stopcock, and practice getting good sparks from the
striker. Once the air has cleared and you can confidently and consistently
get sparks, start over again by closing the needle valve, turning on the
stopcock, opening the needle valve until you hear hissing, and trying, again,
to light it.
Adjusting the Flame
- Adjust the air mix by rotating
the barrel of the burner: screwing the barrel down closes the holes at the
base of the burner, and thus, reduces the air. Screwing the barrel up opens
those holes, and increases the air. The color and condition of the flame
will indicate a proper mix of air and gas. If the flame is yellow and soft,
you need more air. If it is roaring and popping, you need less air. Too
much air may cause the flame to pop and go out. If the air is properly-adjusted,
the flame should be blue and nearly invisible, no matter what size
(how tall) it is the height of the flame does not affect its color.
Many students are mistakenly tempted to try to alleviate a yellow flame by
turning down the gas, when what is really needed is more air. If you
mistakenly try to adjust the color by decreasing the amount of gas, you
will, most likely, cause the flame to extinguish.
- Adjust the gas with the needle
valve until you have a flame of suitable height and intensity. Having an
invisible flame does NOT mean turning the gas so low that there is
a danger of the flame going out it means having a suitably-large flame with
the air adjusted properly so that it is blue and difficult to see, despite its
size. Make any necessary final corrections in air so that the flame forms
a set of nested, nearly-invisible blue cones. The tip of the inner blue
cone is the hottest part of the flame, and the object to be heated should be
positioned just above it. CAUTION: the flame of a properly-adjusted
Bunsen burner will be nearly invisible in a well-lit room dont forget
you have it lit and burn yourself!
- When finished, turn off the gas
at the desk stopcock by turning the handle at right angles to the hose. Do
NOT just walk away and leave a lit burner (unless someone else is
right there, waiting to use it). Double-check, triple-check that ALL
BURNERS ARE OFF before leaving the room. CAUTION: the upper portion of
the burner will be hot, so handle it with care and let it cool a few minutes
before putting it away. The burner may be put away with the rubber hose
attached.
Safely Heating Test Tubes
 Always wear goggles. Adjust the burner to a low flame (about 1
to 1.5 inches tall).
Always wear goggles. Adjust the burner to a low flame (about 1
to 1.5 inches tall).
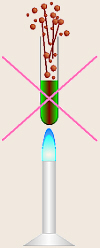 Never hold a tube straight up above a flame. It might suddenly start to boil
causing the contents to explode out.
Never hold a tube straight up above a flame. It might suddenly start to boil
causing the contents to explode out.
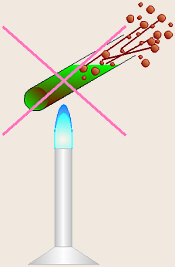 Hold the tube at an angle, and keep it moving so one spot
doesnt suddenly heat and explode the contents out of the tube.
Hold the tube at an angle, and keep it moving so one spot
doesnt suddenly heat and explode the contents out of the tube.
Look around you and observe where all the other people are.
Aim the open end of the test tube in a direction where there are no people,
just in case it does, suddenly, shoot out its contents. Remember,
never point a loaded test tube at anyone.
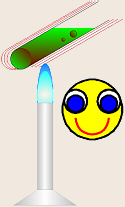 Do remember to hold the tube at an angle, and keep it
moving. That will allow the contents to heat more evenly and gradually,
thereby reducing the chances of having everything suddenly boil/explode out
of the tube.
Do remember to hold the tube at an angle, and keep it
moving. That will allow the contents to heat more evenly and gradually,
thereby reducing the chances of having everything suddenly boil/explode out
of the tube.
When you notice a tube starting to develop bubbles like its getting ready
to start boiling, remove it from the flame before it starts boiling and/or
explodes out.
Other Things to Include in Your Notebook
Make sure you have all of the following in your lab notebook:
- all handout pages (in notebook or separate protocol book)
- all notes you take during the introductory mini-lecture
- all notes and data you gather as you learn to use the burner
- drawings of a Bunsen burner with all parts labeled and of a
striker
- a summary/conclusion in your own words, and any suggestions you
may have
- any returned, graded pop quiz
Copyright © 2010 by J. Stein Carter. All rights reserved.
Based on printed protocol Copyright © 1992 D. B. Fankhauser
and © 1992 J. L. Stein Carter.
This page has been accessed  times since 18 Dec 2010.