Ethanol Determination by Distillation
Fermentation
In this lab, you will use distillation as a means to study the
stoichiometry of the chemical reaction involved in alcohol fermentation as
performed by yeast.
Many microorganisms, notably yeasts and bacteria, extract
energy from their food (glucose) by fermentation. The overall chemical
reaction for this is:
C6H12O6 (glucose) → 2CO2 + 2CH3CH2OH (ethyl alcohol)
or, starting from sucrose or maltose,
C12H22O11 + H2O → 4CO2 + 4CH3CH2OH (ethyl alcohol)
It was this process which Louis Pasteur studied, leading to a
biochemical understanding of biological processes. Humans have known about
and utilized the process of fermentation for many thousands of years.
CO2 liberated by yeast cells doing alcohol fermentation causes
bread to rise. The Egyptians and many subsequent civilizations have
fermented grains such as barley to break the starch down to malt (maltose),
then glucose, and finally alcohol. For at least that long, people have known
that various fruits, especially grapes, could also be fermented to produce
alcoholic beverages. Thus, alcoholic fermentation is the process which is
responsible for the production of wine, beer, and other fermented products.
It is the toxic nature of ethanol which acts to preserve these brews, and
which leads to intoxication upon consumption. In fact, yeasts cannot
generally survive in alcohol concentrations in excess of approximately 12 to
14%. In this lab, we will be studying the process of fermentation as
performed by the yeast, Saccharomyces cerevisiae (sacchar =
sugar; myces = fungus; Ceres = goddess of grain; vis =
to see; -ia = state of, condition of, disease).
Stoichiometry of Fermentation
Todays lab can be used to demonstrate a number of important
principles relating to alcoholic fermentation including the stoichiometry
(the study of the definite proportions in which chemicals will interact with
each other stoichi = an element, metr = measure) of the
conversion of sugar to alcohol. The following conversion factors will be
important, here:
| Molecular Weight of Sucrose/Maltose | 342.17 g/m |
| Moles of EtOH per Mole of Sucrose/Maltose | 4 m |
| Molecular Weight of Ethanol | 46.05 g/m |
| Grams of EtOH per Mole of Sucrose/Maltose | 4 × 46.05 = 184.20 g |
| Grams of EtOH per Gram of Sucrose/Maltose | 184.20 ÷ 342.17 = 0.538 g |
| Density of Pure EtOH at 20° C | 0.789 g/mL |
| Density of Pure H2O at 20° C | 0.99823 g/mL |
| Weight of One Can of Malt Syrup | 1.5 kg (3.3 lb) |
| Percentage of Weight of Maltose in Malt Syrup* | 80% |
| Percentage of Weight of H2O in Malt Syrup* | 20% |
| Weight of 1 C of Granulated Sucrose | 213.97 g |
| Density of Malt Syrup§ | 1.426 g/mL |
*These
percentages were found on another Web site
This was weighed here in our lab
§This number was found on another Web site as 0.084 gal/lb, and since
0.084 gal
= 318.04 mL and 1 lb = 453.59 g,
therefore 453.59 g/318.04 mL = 1.426 g/mL
|
Thus, if the fermentation reaction is 100% efficient, for every gram
of sucrose or maltose that is put in, 0.538 g (= 0.682 mL) of ethanol should
be produced.
In this lab, we may be testing samples of lab brew and/or
root beer made in previous labs. Thus, it would be of interest to reexamine
the recipes from those two labs and calculate the hypothetical stoichiometry
involved.
When we made our root beer, the recipe called for 1 C of sugar
(sucrose) per 2-L bottle. While most of that sugar was included to make the
root beer taste sweet, and not all was intended for the yeast to ferment, if
hypothetically, 100% of that would be converted to alcohol, that would be
| 1 C sucrose | × | 213.97 g sucrose | × | 0.538 g EtOH | = | 115.12 g EtOH |
| 2-L bottle | 1 C | 1 g sucrose | 2-L bottle |
| 115.12 g EtOH | ÷ 2 = | 57.56 g EtOH |
| 2-L bottle | L of root beer |
| 57.56 g EtOH | × | 1 mL EtOH | = | 72.95 mL EtOH |
| L of root beer | 0.789 g EtOH | L of root beer |
For our lab brew, the amount of sugar going in depended on
which recipe was followed. The original, Fankhauser recipe calls for 6 C
of sucrose + 1⅓ C of canned malt syrup. Alternatively, we sometimes
make the lab brew with one, whole, 1.5-kg can of malt, and no added sucrose.
As you, hopefully, recall, the recipe makes 5 gal, or about 10 2-L bottles
of lab brew. Lets start with the calculations for the latter situation,
first, because they are easier:
| 1500 g syrup | × | 0.80 g maltose | × | 0.538 g EtOH | = | 32.28 g EtOH |
| 20 L of lab brew | 1 g syrup | 1 g maltose | L of lab brew |
| 32.28 g EtOH | × | 1 mL EtOH | = | 40.91 mL EtOH |
| L of lab brew | 0.789 g EtOH | L of lab brew |
Then, for the sucrose in the original, Fankhauser recipe,
| 6 C sucrose | × | 213.97 g sucrose | × | 0.538 g EtOH | = | 34.53 g EtOH |
| 20 L of lab brew | 1 C sucrose | 1 g sucrose | L of lab brew |
and for the maltose,
| 1⅓ C syrup | × | 236.64 mL syrup | × | 1.426 g maltose | × | 0.538 g EtOH | = | 12.10 g EtOH |
| 20 L | 1 C syrup | 1 mL syrup | 1 g maltose | L of lab brew |
which can be combined and converted to milliliters:
| 34.53 + 12.10 g EtOH | × | 1 mL EtOH | = | 59.10 mL EtOH |
| L of lab brew | 0.789 g EtOH | L of lab brew |
Expressing Concentrations of Ethanol Solutions
The concentration of ethanol solutions can be expressed in
several ways. Often, molarity is not used, but rather concentration is
expressed as either percent-by-weight (%w/w) or percent-by-volume (%v/v).
Wine bottle labels show the amount of alcohol in their contents in terms of
%v/v.
The density of ethanol at 20° C is 0.789 g/mL, so pure ethanol is lighter
than water (density of 0.99823 g/mL), but despite knowing that, in the case
of alcohol solutions, its not easy to convert %w/w to/from %v/v.
As you may have learned in chemistry, alcohol-water mixtures take up
significantly less volume than the total of the components. For example, if
you mix 100 mL of ethanol with 100 mL of water, youll end up with only about
192 mL of solution. However, since that 100 mL of ethanol weighs 78.9 g
and that 100 mL of water weighs 99.8 g, even though you end up with only
192 mL of solution, that much would still weigh 78.9 + 99.8 = 178.7 g
its all there, but it takes up less space. In contrast, if you mix 100 g
(= 126 mL) of ethanol with 100 g (= 100.18 mL) of water, youll end up with
200 g of solution. However, since the decrease in volume of various
ethanol-water mixtures varies with the amounts of each included, theres no
easy way to predict what the final volume of that mixture will be.
However, in spite of how complicated all that seems to be,
a lot of work has been done by analytical chemists studying the relationship
between the specific gravity of ethanol solutions and their
concentrations, expressed as either %w/w or %v/v, and these relationships
have been published in various forms in a number of chemistry handbooks.
Thus, similar to the Sugar
in Soft Drinks lab you did, here also, we can weigh 100 mL of an ethanol
solution and 100 mL of dH2O, then calculate the specific gravity
of that solution, and look that number up on a chart to determine either %w/w
or %v/v of that solution. Since you may be more familiar with the %v/v
used on alcoholic beverages, we will use a chart that correlates specific
gravity with those numbers.
Thus, the table for percentage of alcohol in a solution (excerpted from a
larger one in one of the chemistry handbooks) which is included
here and in your protocol is based on percentage by volume, in other
words, how many milliliters of ethanol per 100 mL of solution.
Background on Distillation
The technique of distillation as a method of separating
ethanol from the ferment will be demonstrated in this lab exercise.
Distillation is the process of heating a solution to its boiling point,
passing the vapors through a cooling device called a
condenser, and collecting the liquid which condenses. Because the
boiling point of ethanol is 78.5° C, so considerably lower than that of
water (100° C), almost all of the alcohol will boil off first, followed by
the water. Thus if you start with 100 mL of solution, by the time just
under 100 mL has distilled, you will have collected all of the alcohol and
almost all of the water. If you then q. s. the resulting
distillate to exactly 100 mL with dH2O, you will restore
it to its original volume and concentration. Because of the alcohol it
contains, the distillate will have a specific gravity lower than that of
distilled water. By the use of the table provided, the percentage of alcohol
in a solution can be determined by knowing the specific gravity of the
solution, assuming that no interfering substances co-distill with ethanol
which would affect the specific gravity of the distillate.
Interestingly, since the boiling point of ethanol is so far
below the boiling point of water, the ethanol can be concentrated by the
process of fractional distillation (collecting the distillate in
aliquots rather than the whole solution). This is the source of liquors
with higher alcohol contents, but is not what we will be doing in this
lab.
A liquid must be brought just slightly above its boiling point
before bubble initiation can begin to start it boiling. As a bubble of vapor
appears within the liquid, it may do one of two things: if it is below a
minimum size, it will collapse because of the surface tension of the liquid,
or if it is larger than the critical size, grow and rise to the surface of
the liquid. If a liquid, which is free of solid impurities or dissolved
gases, is heated slowly, a temperature much above the boiling point can be
reached without any boiling actually taking place. This superheating
occurs because extra energy is required before bubble formation is initiated.
If a bubble should start to form in such a superheated solution, it might
suddenly grow with almost explosive violence enough to shatter the container.
This problem, called bumping, can be overcome by adding a boiling
chip, a piece of porous material, to the liquid before it is heated to
the boiling point. The pores act as built-in bubbles so that a liquid cannot
superheat. As the distillation proceeds, the air in these pores is replaced
by vapor of the distilling material, but this vapor cannot condense because
the temperature of the liquid is just slightly above its boiling point.
However, whenever a distillation is stopped and then started again, a new
boiling chip will be needed because the vapor in the pores will have
condensed and filled the pores with liquid.
(This, by the way, has
direct practical application. There
have been numerous cases in which someone tried to heat water to boiling in
a clean glass or china container placed in a microwave. When the person
checked on the water, it wasnt boiling, yet, so the person nuked it for
a longer time, and then again, and again, without it ever starting to boil.
Then, in frustration, the person removed the container from the microwave,
jostling the water in the process, and simultaneously looked into it.
However, the process of jostling the water initiated bubble formation in this
superheated water, causing it to bump and explode out of the container,
severely scalding the persons face. The moral of the story is, if you
need to heat water in a microwave, always make sure to include some
porous substance such as a toothpick, teabag, or loose tea leaves, etc.
that will serve as a site of bubble initiation, thereby allowing the water
to boil without bumping.)
Safety Considerations
- Remember that while Bunsen burners are in use, long hair should be tied
back (anything long enough to go in a rubberband counts). Secure all loose
clothing, sleeves, etc.
- Because, as explained above, possible bumping could cause a flask to
explode, goggles should be worn while working near a running distillation
apparatus.
- While many of them have broken and been replaced, some of the thermometers
in the stoppers were using may contain mercury (the silver stuff), which
is quite toxic to humans. Your group should try to obtain a stopper with a
(red) spirit thermometer in it, and only use a mercury-containing thermometer
if there are not
enough spirit thermometers for everyone. If you are using one of the
remaining mercury thermometers, handle it VERY carefully! If
one of these thermometers does break, notify your instructor and/or the lab
manager AT ONCE! Spilled mercury must be cleaned up using a
special mercury spill kit. Students are NOT allowed to do this only
trained lab personnel are to clean up mercury spills.
Distillation of Ethanol Solutions
- Work in groups for this lab.
- Locate a spot for your group to set
up your apparatus. This needs to be near a gas outlet and a sink.
- Each group should obtain the
equipment needed to set up your distillation apparatus:
- gas outlet, cold water tap, and
sink in close proximity to each other
- a pre-assembled lid consisting of
- #10 two-holed rubber stopper
- 15-cm glass tubing, bent 60
inserted into one hole
- #4 one-holed rubber stopper
attached to other end of glass tubing
- thermometer,-10 to 110° C
inserted into the other hole
- 2 ring stands
- 1 universal clamp
- 1 large ring
- 1 wire gauze (screen)
- 2 approx. 1-m lengths of rubber
tubing
- 1 Bunsen burner with rubber tubing
attached, plus striker
- 1 Liebig condenser
- 500-mL wide-mouth Erlenmeyer flask
- 100-mL volumetric flask, clean &
dry
- funnel that will fit into volumetric
flask without tipping over
- Your group will also need these
supplies as you do the lab:
- access to a balance
- regular thermometer
- 100 mL of dH2O
- ice bath
- 125 to 150 mL of decanted lab brew (possibly root beer or hard
cider if available?)
- 100-mL grad. cylinder
- 250-mL Erlenmeyer flask
- several boiling chips
- several drops of vegetable oil
- refractometer (share with the rest of the class)
- While others are setting up the
distillation apparatus as described below, one person from your group should
weigh the DRY volumetric flask to the nearest 0.01 g (you may
use the electronic balance), and everyone in the group record the weight in
his/her notebook (be careful this in your only chance to get the dry
weight!).
- Then, that person should fill the
flask with dH2O to the bottom of the neck (dont adjust it
to exactly 100 mL, yet). Then, with a thermometer in the water, use the ice
bath (as per the Sugar in Soft Drinks lab) to adjust the temperature to
exactly 20° C (remember to remove the flask from the ice bath when the water
is a little above 20° because the temperature will continue to drop a bit).
- Then, q. s. to exactly 100 mL,
completely dry the outside of the flask, make sure there are no air
bubbles in the water, and weigh the flask-water combination, again to the
nearest 0.01 g. Everyone should record the flask + water weight. As in
previous labs, subtract to determine the weight of the dH2O
(record this in your notebooks, too). Place the used water in the
designated container.
- Another person from the group should
pour about 125 mL of the decanted lab brew (or root beer) into a 250-mL
Erlenmeyer flask and shake vigorously to degas. (Note that because the
boiling point of ethanol is so low, we cannot heat the solution to degas
it like we did with our soft drinks.)
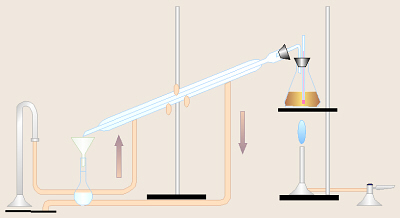
- While one person is weighing the
flask and water and another person is shaking the lab brew, others in the
group should set up a distillation
assembly as pictured here and as demonstrated by your instructor.
-
- Attach the Bunsen burner
to the gascock.
- Place the ring on one of
the ringstands, about 5 cm above the mouth of the burner, and
make sure the ring is horizontally straight. If the ring slopes, you
may need to turn it over to get it level.
- Then, set the wire
gauze, asbestos pad down, on the ring. (The asbestos pad under
the flask moderates the amount of heat transferred to the flask so
that control of distillation can be maintained.)
- Use one piece of tubing
to attach the lower inlet on the condenser to the
cold water source.
- Attach one end of the other
piece of tubing to the upper outlet on the condenser and
the other end should run into the sink. Check the tightness of
the fittings. Tubing should be attached to the condenser such that
water is flowing from the BOTTOM to the TOP.
- Attach the lid
(thermometer, etc.) assembly lightly on the 500-mL flask and
set that on the wire gauze. If possible, set things up so that
you can read the thermometer (may or may not be possible depending on
location of sink, etc.) when the smaller stopper is pointing toward
the condenser. Thermometers cannot be turned around within
the stopper (dont try itll break and cut you!), so if there are
enough extras, you may exchange the lid assembly for a different one
if you need one facing the other direction (supplies are limited, so
this may not be possible).
- Place the funnel into the
100-mL volumetric flask.
- Attach the clamp to the
second ringstand, and center the condenser in the clamp. The
condenser should be oriented such that the cut angle of the condenser
spout is pointing down and the inlet and outlet (attached to the
tubing) are pointing upward.
- Adjust the height and angle of
the clamp so that the wide (top) end of the condenser will connect
securely with the lid assembly, and the lower end of the condenser
is just above the funnel.
- Use the 100-mL graduated
cylinder to
measure exactly 100 mL of the degased lab brew (if you measure
carefully, the percentage of error from using the cylinder rather than a
volumetric flask will be negligible). Pour this into the 500-mL
wide-mouth Erlenmeyer flask, being careful to get it all. Rinse the
graduated cylinder with 50 mL of dH2O and add this to the
500-mL flask. That will do two things: get any remaining lab brew that
was in the graduated cylinder, and add some extra water to what will be
boiled so it doesnt boil dry.
- Add 2 or 3 boiling chips to
the 500-mL flask. Then, add two or three drops of vegetable oil to help
prevent foaming. Replace the 500-mL flask on the ring/wire gauze and firmly
attach the lid assembly. Attach the 1-hole stopper firmly to the
condenser. Make sure the funnel and volumetric flask are under the spout of
the condenser.
- Gently turn on the cold water supply
for the condenser. Adjust the flow to about 100 mL/10 sec (time how long it
takes to fill a 100-mL beaker). The backflow preventers on the faucets may
prevent you from adjusting the flow to exactly 100 ml/10 sec, but come as
close as you can. A tiny bit faster is better than too slow.
Double check that all stoppers are snugly seated into their joints.
- When you have everything set up and
ready to go, the water flow adjusted, etc., then ask your instructor to
check out the assembly and verify that its all OK.
- Once you have the OK from your
instructor, light the Bunsen burner, properly adjust the air and gas for
a hot flame,, and place the burner under the boiling flask. Monitor the
temperature of the contents of the boiling flask. When the temperature of
the liquid reaches 80 to 85° C, reduce the flame so the liquid boils slowly.
BEWARE OF FOAMING! If the liquid starts foaming or boiling too vigorously,
be ready to pull the burner out from under the flask until you reduce the
flame.
- Once the foam has subsided, the size
of the flame may be carefully increased. Once drops of distillate are
dripping from the condenser into the volumetric flask, adjust the flame such
that the distillation rate is 2 drops/sec.
- Monitor the volume of distillate in
the volumetric flask. Turn off the burner when the fluid level reaches the
lower end of the neck of the volumetric flask. Because EtOH has a
lower boiling point than water, this will get all the EtOH and most of
the H2O from the lab brew. When the volume of distillate in the
volumetric flask has reached this level, turn off the gas and remove the
volumetric flask.
- As was done with the dH2O,
use a thermometer and ice bath to adjust the temperature of the flask and
contents to exactly 20° C (remember to remove the flask from the ice bath
when the distillate is a little above 20° because the temperature will
continue to drop a bit).
- Q.s. with 20° C dH2O
to 100.00 mL (thus restoring the original volume and concentration of EtOH).
If there are droplets of distillate clinging to the thermometer, you should
use a couple drops of the water youre adding to rinse them into the flask.
Dry off the outside of the flask, then weigh flask + distillate
and record the weight in your lab notebook. Subtract to determine the
weight of 100.00 mL of distillate.
- As was done in the Sugar in Soft
Drinks lab, determine the specific gravity of the distillate by dividing the
weight of the distillate by the weight of the dH2O.
| wt distillate @ 20° C | × sp gr of distillate |
| wt dH2O @ 20° C |
Using the table below or in your protocol, locate the closest specific
gravity and read the corresponding percentage by volume of EtOH.
- Hold a piece of Parafilm over
the end of your flask with a finger or thumb, and turn the flask upside down
several times to make sure the contents are evenly mixed.
- Put a couple drops of dH2O
in the refractometer. With a bright light source shining on the refractometer,
look through it and focus it by turning the black band around the eyepiece.
You should see a blue area and a white area. Notice where the boundary
between these two crosses the scale on the left-hand side of your view.
With plain dH2O in the refractometer, this boundary should be at
the bottom of the left-hand scale, at 1.3330. If it is not, there is a
metal screw that can be turned to adjust it.
- Use a Kimwipe to wipe the water off
the refractometer. Then, place a few drops of your distillate in the
refractometer, and close the lid. Notice where the blue-white boundary
crosses the left-hand scale, now (1.33??).
Record this number in your lab notebook and use the right-hand columns on
the provided table to determine the corresponding
percentage by volume of EtOH. (Be very careful not to bump the screw on the
top it is used to set the refractive index of
dH2O to 1.3330, and if it gets moved, your reading will be off.)
Remember to interpolate.
- When you are done, wipe the
distillate off the refractometer with a Kimwipe. Please leave the
refractometer clean and dry when you are done with it.
- Clean up! Rinse out your glassware,
but do not let the boiling chips go down the drain. Place them in
the trash. Place all wet glassware, tubing, etc. in the
designated locations.
- Someone from your group should
submit your groups data online.
- For an extra mathematical challenge:
how does the amount of alcohol in the fermented lab brew or root beer relate
to the starting quantity of sugar? Try to figure out how much sugar must
have been present in the original batch of brew to make that percentage of
alcohol. Conversely, knowing how much sugar was added, what percentage
of it was actually used/fermented?
Table of Specific Gravity and Percent Alcohol
| Sp Gr & % by Vol 20/20 |
Ref
Index |
% by V
@ 20° C |
| Sp Gr |
% by V |
Sp Gr |
% by V |
Sp Gr |
% by V |
Sp Gr |
% by V |
| 1.0000 |
0.00 |
0.9954 |
3.12 |
0.9908 |
6.49 |
0.9862 |
10.20 |
1.33304 |
0.16 |
| 0.9999 |
0.07 |
0.9953 |
3.19 |
0.9907 |
6.57 |
0.9861 |
10.28 |
1.33312 |
0.34 |
| 0.9998 |
0.13 |
0.9952 |
3.26 |
0.9906 |
6.65 |
0.9860 |
10.36 |
1.33319 |
0.52 |
| 0.9997 |
0.20 |
0.9951 |
3.33 |
0.9905 |
6.73 |
0.9859 |
10.44 |
1.33327 |
0.69 |
| 0.9996 |
0.26 |
0.9950 |
3.40 |
0.9904 |
6.80 |
0.9858 |
10.53 |
1.33335 |
0.85 |
| 0.9995 |
0.33 |
0.9949 |
3.47 |
0.9903 |
6.88 |
0.9857 |
10.61 |
1.33343 |
1.03 |
| 0.9994 |
0.40 |
0.9948 |
3.54 |
0.9902 |
6.96 |
0.9856 |
10.69 |
1.33350 |
1.21 |
| 0.9993 |
0.46 |
0.9947 |
3.61 |
0.9901 |
7.04 |
0.9855 |
10.78 |
1.33358 |
1.36 |
| 0.9992 |
0.53 |
0.9946 |
3.68 |
0.9900 |
7.12 |
0.9854 |
10.86 |
1.33366 |
1.51 |
| 0.9991 |
0.60 |
0.9945 |
3.76 |
0.9899 |
7.19 |
0.9853 |
10.94 |
1.33374 |
1.66 |
| 0.9990 |
0.66 |
0.9944 |
3.83 |
0.9898 |
7.27 |
0.9852 |
11.03 |
1.33381 |
1.81 |
| 0.9989 |
0.73 |
0.9943 |
3.90 |
0.9897 |
7.35 |
0.9851 |
11.11 |
1.33389 |
1.96 |
| 0.9988 |
0.80 |
0.9942 |
3.97 |
0.9896 |
7.43 |
0.9850 |
11.19 |
1.33397 |
2.11 |
| 0.9987 |
0.87 |
0.9941 |
4.04 |
0.9895 |
7.51 |
0.9849 |
11.28 |
1.33405 |
2.26 |
| 0.9986 |
0.93 |
0.9940 |
4.11 |
0.9894 |
7.59 |
0.9848 |
11.36 |
1.33412 |
2.41 |
| 0.9985 |
1.00 |
0.9939 |
4.18 |
0.9893 |
7.67 |
0.9847 |
11.45 |
1.33420 |
2.56 |
| 0.9984 |
1.07 |
0.9938 |
4.26 |
0.9892 |
7.75 |
0.9846 |
11.53 |
1.33428 |
2.70 |
| 0.9983 |
1.14 |
0.9937 |
4.33 |
0.9891 |
7.82 |
0.9845 |
11.61 |
1.33435 |
2.85 |
| 0.9982 |
1.20 |
0.9936 |
4.40 |
0.9890 |
7.90 |
0.9844 |
11.70 |
1.33443 |
3.00 |
| 0.9981 |
1.27 |
0.9935 |
4.48 |
0.9889 |
7.98 |
0.9843 |
11.78 |
1.33451 |
3.15 |
| 0.9980 |
1.34 |
0.9934 |
4.55 |
0.9888 |
8.06 |
0.9842 |
11.87 |
1.33459 |
3.30 |
| 0.9979 |
1.41 |
0.9933 |
4.62 |
0.9887 |
8.15 |
0.9841 |
11.95 |
1.33466 |
3.45 |
| 0.9978 |
1.48 |
0.9932 |
4.69 |
0.9886 |
8.23 |
0.9840 |
12.04 |
1.33474 |
3.59 |
| 0.9977 |
1.54 |
0.9931 |
4.77 |
0.9885 |
8.31 |
0.9839 |
12.12 |
1.33482 |
3.73 |
| 0.9976 |
1.61 |
0.9930 |
4.84 |
0.9884 |
8.39 |
0.9838 |
12.21 |
1.33489 |
3.88 |
| 0.9975 |
1.68 |
0.9929 |
4.91 |
0.9883 |
8.47 |
0.9837 |
12.29 |
1.33497 |
4.03 |
| 0.9974 |
1.75 |
0.9928 |
4.98 |
0.9882 |
8.55 |
0.9836 |
12.38 |
1.33505 |
4.17 |
| 0.9973 |
1.81 |
0.9927 |
5.06 |
0.9881 |
8.63 |
0.9835 |
12.47 |
1.33513 |
4.32 |
| 0.9972 |
1.88 |
0.9926 |
5.13 |
0.9880 |
8.71 |
0.9834 |
12.55 |
1.33520 |
4.47 |
| 0.9971 |
1.95 |
0.9925 |
5.21 |
0.9879 |
8.79 |
0.9833 |
12.64 |
1.33528 |
4.61 |
| 0.9970 |
2.02 |
0.9924 |
5.28 |
0.9878 |
8.88 |
0.9832 |
12.73 |
1.33536 |
4.75 |
| 0.9969 |
2.09 |
0.9923 |
5.36 |
0.9877 |
8.96 |
0.9831 |
12.81 |
1.33543 |
4.90 |
| 0.9968 |
2.15 |
0.9922 |
5.43 |
0.9876 |
9.04 |
0.9830 |
12.90 |
1.33551 |
5.04 |
| 0.9967 |
2.22 |
0.9921 |
5.51 |
0.9875 |
9.13 |
0.9829 |
12.99 |
1.33559 |
5.19 |
| 0.9966 |
2.29 |
0.9920 |
5.58 |
0.9874 |
9.21 |
0.9828 |
13.07 |
1.33566 |
5.33 |
| 0.9965 |
2.36 |
0.9919 |
5.66 |
0.9873 |
9.29 |
0.9827 |
13.16 |
1.33574 |
5.47 |
| 0.9964 |
2.43 |
0.9918 |
5.73 |
0.9872 |
9.38 |
0.9826 |
13.25 |
1.33582 |
5.61 |
| 0.9963 |
2.50 |
0.9917 |
5.81 |
0.9871 |
9.46 |
0.9825 |
13.34 |
1.33590 |
5.76 |
| 0.9962 |
2.57 |
0.9916 |
5.88 |
0.9870 |
9.54 |
0.9824 |
13.43 |
1.33597 |
5.90 |
| 0.9961 |
2.64 |
0.9915 |
5.96 |
0.9869 |
9.62 |
0.9823 |
13.51 |
1.33605 |
6.05 |
| 0.9960 |
2.70 |
0.9914 |
6.03 |
0.9868 |
9.70 |
0.9822 |
13.60 |
1.33613 |
6.19 |
| 0.9959 |
2.77 |
0.9913 |
6.11 |
0.9867 |
9.79 |
0.9821 |
13.68 |
1.33620 |
6.33 |
| 0.9958 |
2.84 |
0.9912 |
6.18 |
0.9866 |
9.87 |
0.9820 |
13.77 |
1.33628 |
6.47 |
| 0.9957 |
2.91 |
0.9911 |
6.26 |
0.9865 |
9.95 |
0.9819 |
13.86 |
1.33636 |
6.61 |
| 0.9956 |
2.98 |
0.9910 |
6.34 |
0.9864 |
10.03 |
0.9818 |
13.95 |
1.33643 |
6.75 |
| 0.9955 |
3.05 |
0.9909 |
6.41 |
0.9863 |
10.11 |
0.9817 |
14.04 |
1.33651 |
6.90 |
Other Things to Include in Your Notebook
Make sure you have all of the following in your lab notebook:
- all handout pages (in notebook or separate protocol book)
- all notes you take during the introductory mini-lecture
- all notes and data you gather as you perform the experiment
- all requested calculations based on those data
- print-out of class data
- drawing (yours!) of the distillation set-up with all key features
labeled and annotated as needed
- drawings (yours!) of a refractometer and of the scale inside the
refractometer
- answers to all discussion questions, a summary/conclusion in your
own words, and any suggestions you may have
- any returned, graded pop quiz
Copyright © 2011 by J. Stein Carter. All rights reserved.
Based on printed protocol Copyright © 1978 D. B. Fankhauser
and © 1993 J. L. Stein Carter.
This page has been accessed  times since 24 Aug 2011.