Diffusion and Osmosis
Molecular Movement in Cellular Solutions
The cytoplasm of cells is 70 to 95% water. Dissolved or
dispersed in that water are various salts, sugars, proteins, etc. which
make up a complex mixture of molecules.
Molecules in liquids and gases are in constant motion due to
their kinetic energy. Substances dissolve in water and disperse throughout
a solution because they are constantly in motion. In part, this motion is
due to Brownian motion in which molecules of solutes and particles
which are dispersed in a solution are bombarded by moving water molecules,
which jostles them around, causing them to move even more. (Note, in a very
quiet room, you may be able to hear the sound of Brownian motion as air
molecules bombard your ear drums.) Thus,
diffusion is the tendency for molecules of any substance to spread out
randomly into the available space. Substances (solutes) will diffuse from
more concentrated to less concentrated areas or solutions. Passive
transport is diffusion across a semipermeable, biological membrane.
Sometimes, though, solute molecules are too large to go through a semipermeable
membrane, or perhaps, have an electrical charge which does not allow them to
pass through the membrane. In spite of that, there is still a tendency for
the concentrations of the solutions on both sides of that membrane to
equalize. One way in which that is acomplished is through the process of
osmosis (osmo = to push; -sis = the act of), which is a
special case of passive transport in which water diffuses across a
selectively permeable membrane from less to greater solute concentration to
try to equalize the concentrations of the solutes.
If a cell and its watery environment have the same
concentrations of solutes, they are said to be isotonic (iso
= equal; tono = tone, tension, stretched) solutions. If the
environment has a greater concentration of solutes, it is hypertonic
(hyper = over, above) with respect to the cell contents, and the cell
will shrink as it loses water. If the environment has a lesser concentration
of solutes, it is hypotonic (hypo = under, beneath) relative
to the cell contents and the cell will swell or, in the case of animals,
even burst as it gains water.
Osmosis
Set this part up first because it takes the longest to do.
Because you will be taking readings every 15 min, you can do the other parts
of the lab in between taking readings. Work in groups of 5 students so each
person can adopt one of the 5 solutions to be tested. Each person should
record the data for all 5 solutions in his/her lab notebook.
- Each group should obtain 5 pieces of
dialysis tubing approximately 9 in (20 cm) long and 5 100-mL graduated
cylinders
- Soak each piece of dialysis tubing
under cool, running tap water, rolling the end between your fingers until it
opens up. Run tap water through it until it is completely open.
- Tie a knot in one end of each tube
to seal it, placing the knot as close to the end as possible. Fill the tube
with tap water, and while pinching the open end to hold it shut, gently
squeeze the tube to check for leaks. If you find a leak, get a new piece of
tubing.
- Each person in the group should pick
one of the following solutions, so that as a group, all 5 are tested. These solutions
should already have been made by the lab staff and should be availabe on a
cart or the instructors bench. Each person should fill his/her tubing
bag with his/her chosen solution.
- tap water
- 25% salt (NaCl) in dH2O
- 25% glucose (C6H12O6) in dH2O
- 25% sucrose (C12H22O11) in dH2O
- 25% egg albumin in saline solution
- When filling the bags, leave them a
little flaccid (flacc = flabby) or limp because later on they
may absorb water and become turgid (turg = swell, swollen) or
rigid, even to the point of bursting if too full.

- Starting below the fluid level in
order to avoid trapping air bubbles inside, twist the open end shut so that
you have enough unused end to tie. Like tying a balloon, tie a knot in the
open end of the bag to seal it. Again, double-check to avoid trapping air
bubbles inside.
- When the tube is sealed, rinse it
under tap water to remove any spills, then blot mostly dry by gently rolling
on a paper towel. Do not let it get overly dry. You want the surface of
the bag to be dry enough to not add excess weight when you weigh it, but
it should not start to dry out.
- Using the electronic balance and
a weighing boat (do NOT put your bags directly on the balance
pan!), weigh the bag to the nearest 0.01 gm and record the weight in your lab
notebook. If there are few-enough groups in your class and enough computers
each group may pick a computer, and also
enter weight data
as they are being obtained rather than waiting until the end of class to
entering all the data at once. This first weighing will be your time 0
weight.
- For your group, obtain 5 100-mL
graduated cylinders and fill each approximately ¾ full with
dH2O. Label one for each of the solutions to be used, and gently
submerge that bag in that cylinder.
- Every 15 min. for the next 90 min.,
remove the bag and gently dry it as before, then weigh it (each person should
keep track of the time for his/her own bag). Record the weight
in your lab notebook (and in the computer). Note any change in the way the
bag feels does it increase or decrease noticeably in turgidity?
Is there any visible evidence of the passage of molecules from the bag to the
external water (color change)? In between weighings, complete the rest
of the parts of the lab.
- After you take your last reading,
with the bag still out of the water, add a couple drops of silver
nitrate (AgNO3) to the water in the cylinder and observe what
happens. CAUTION: SILVER NITRATE STAINS SKIN BLACK UNTIL IT WEARS OFF
DO NOT GET THIS ON YOUR SKIN OR SPILL ANY!!! (Note: this is a
light-sensitive reaction, so if you get some on you, you wont know it right
away, but by the next day, you may see black spots.)
If chloride ion (Cl) is present, it will react with
the silver ions (Ag+) to form silver chloride (AgCl) which is not
water-soluble and, thus, shows up as a white precipitate by the following
chemical reaction:
AgNO3 + Cl → AgCl↓ + NO3
Is there chloride ion present in your cylinder? You started out with
dH2O, so think about what might have been the source of that
chloride and how it got into the water in the graduated cylinder.
(Optionally, as time and interest allow, a flame test could be conducted to
test for the presence of Na+ and/or Benedicts Solution could be
used to test for glucose in the cylinder water.)
- Clean up! Dump the water out of the
graduated cylinder, rinse the cylinder, and put it in one of the rack to
dry. Snip the bag open and rinse its contents down the drain. Place the
bag, itself, in the trash. Check your table top for spills, etc., and make
sure it and the balance you used are clean before you leave for the day
- Do the following calculations for
each time for each bag of solution:
- For each time subtract the
initial weight of the bag from the weight at the end of that time to
determine the change in weight of that bag:
wtfin wtinit = Δwt
- Then, for each substance for
each time, calculate the percent change in weight by dividing the
change in weight by the initial weight and multiplying by 100 to
change the answer to a percentage:
Δwt/wtinit × 100 = %Δwt
- In your notebook, make a
graph of time (minutes from the start) on the X-axis, versus percent
weight change on the Y-axis. Plot each of your groups five bags
(five lines) on the graph.
- If you have not already done so,
someone from your group should
submit your groups data online.
Once all class data have been submitted, you may
view and print class data.
Brownian Motion
This may either be done as a class demonstration, projected
on the screen, or individually, by students.
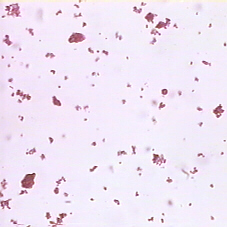
Carmine Suspension
Using a microscope slide and coverslip, make a wet mount of
a carmine (a red dye) suspension and examine under the microscope. This
is not a solution because the carmine does not actually dissolve in the
water, but rather, tiny bits of carmine are suspended in (float around in)
the water and may be seen with a microscope. Describe what you see. Are
any of the particles, especially the smaller ones, moving? Hopefully, you
should see them jiggling around and zig-zagging. This type of motion is
called Brownian motion after Robert Brown who first described it. The water
molecules, which are invisible, are in constant motion and are slamming into
the carmine particles (like pool balls), causing them to jump around. Note
that if you see everything drifting/flowing in one direction, for this
experiment, thats not something of significance that motion is due to
the water under the coverslip beginning to evaporate (dry up).
Diffusion
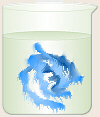 Either as a class demonstration or in your group, put some
tap water in a beaker. Set the beaker on a table and let it sit until calm.
Make sure it doesnt accidentally get bumped, jostled, or picked up dont
disturb it once its calm. Gently add a couple drops of methylene
blue (or another dye) with the dropper near the surface of the water so as
to disturb the water as little as possible. Observe what happens over time.
Do not bump or move the beaker once the dye is added.
Either as a class demonstration or in your group, put some
tap water in a beaker. Set the beaker on a table and let it sit until calm.
Make sure it doesnt accidentally get bumped, jostled, or picked up dont
disturb it once its calm. Gently add a couple drops of methylene
blue (or another dye) with the dropper near the surface of the water so as
to disturb the water as little as possible. Observe what happens over time.
Do not bump or move the beaker once the dye is added.
 As time, interest, and availability of substances alow,
another somewhat-similar demonstration that may be done is:
As time, interest, and availability of substances alow,
another somewhat-similar demonstration that may be done is:
if milk is available, place some whole milk in a saucer. Gently add
one drop each of red, yellow, green, and blue food coloring, each in a
different quadrant of the milk. Then, gently add one or two drops of dish
detergent (supposedly Dawn® works well) to the center of the milk.
Observe what happens over time. The explanation for whats going on here
is actually complicated, because in addition to diffusion, there are other
things happening as the detergent emulsifies the butterfat thats homogenized
in the milk, plus in addition to the food coloring, the detergent is also
diffusing throughout the milk. Milk is an emulsion, even before being
homogenized. The detergent is also a surfactant, a substance which
reduces the surface tension of water.
(If you are having a family gathering for
Thanksgiving, this is a good magic trick you can use to entertain a
bunch of children and keep them entertained for at least a little while.)
Isotonic, Hypotonic, and Hypertonic Solutions
Many types of cells exist in an isotonic environment;
that is, the concentrations of the solutes in the external environment are
the same as the concentrations of those solutes inside the cell. However,
if the external environment has a higher concentration of solutes (is
hypertonic, water will flow out of the cell, and the cell will, thus,
shrivel up. In animal cells, this is called crenation. It is possible
that an animal cell could recover from mild crenation if/when placed back into
a normal environment. In plant cells, as the cell shrinks and the plasma
membrane pulls away from the cell wall, there is a chance it might tear.
This is called plasmolysis (lysis = loosen, break apart). If
the plasma membrane pulls away from the cell wall without tearing, it is
possible that the cell could recover when placed back into an isotonic
environment, but if plasmolysis has occurred, the cell is dead. If the
external environment has a lower solute concentration than the inside of the
cell (is hypotonic), water will flow into the cell. A plant cell
surrounded by its cell wall is sort-of like a water balloon in a cardboard
box it becomes turgid as the increased water presses the cell tightly
against its cell wall, but the cell usually does not burst, and when placed
back into an isotonic environment, can often recover. Animal cells, however
do not have a cell wall, and so will swell until they burst open
(cytolysis).
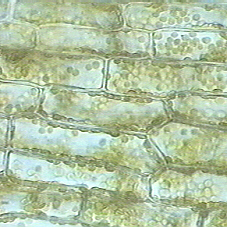
Normal Elodea Cells
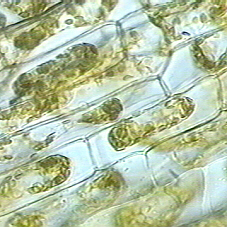
Plasmolysis in Elodea
Make a wet mount of an Elodea leaf as in the Cells
and Organelles lab. Examine and draw a typical cell as seen under the
microscope.
Put a drop at a time of 15% salt solution at one edge of the
coverslip and observe what happens to the leaf. If your slide starts to get
really wet, use a Kimwipe to absorb some of the excess. DO NOT GET
LIQUID ON THE MICROSCOPE!!! If some does get on the microscope,
immediately and thoroughly wipe it off! Record how many drops of salt
solution were added to cause a change in the appearance of the cells.
Draw and describe this change.
Now, add distilled water a drop at a time. DO NOT GET
THIS ON THE MICROSCOPE!!! As before, if your slide starts to get too
wet, use a Kimwipe to absorb some of the excess. If some does get on the
microscope, wipe it off immediately and thoroughly!
Observe what happens and record how many drops of water were needed to cause
a change in the appearance of the cells. Draw and describe this change.
Optionally, if someone in your class is willing to donate
a drop of blood, your class could also examine the effects of adding salt
solution and/or dH2O to blood cells.
WHEN YOU ARE DONE: make sure your microscope is CLEAN AND
DRY before putting it away. Make sure there is absolutely no salt
solution or water spilled on it especially check around the hole where the
condenser comes up through the stage. Remember to follow all the steps for
proper storage of the microscope.
Other Things to Include in Your Notebook
Make sure you have all of the following in your lab notebook:
- all handout pages (in notebook or separate protocol book)
- all notes you take during the introductory mini-lecture
- all notes and data you gather as you perform the experiment
- drawing (yours!) of the osmosis set-up (dialysis tubing bags, etc.)
- drawings (yours!) of any other parts of the experiment such as diffusion
- answers to all discussion questions, a summary/conclusion in your
own words, and any suggestions you may have
- any returned, graded pop quiz
Copyright © 2011 by J. Stein Carter. All rights reserved.
Based on printed protocol Copyright © 1988 J. L. Stein Carter.
This page has been accessed  times since 19 Aug 2011.