Dissecting Scope Use
Care of Dissecting Scope:
As with our other microscopes, these need to be treated with
care. Below are instructions for their use. These are stored in cabinets in
the kitchen area.
Picking It Up:
Carefully pick up the scope with your seat number on it by
grasping the arm with one hand and supporting the base with your other
hand held flat, underneath. Do NOT push your fingers up underneath the base,
because you may push out the stage plate, which is not attached. If
you accidentally do press it up, it WILL fall on the floor and probably
break. Carry the microscope to your desk.
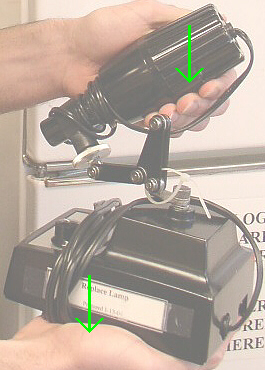 Make a second trip to pick up the light-and-transformer with
your seat number on it. DO NOT TRY TO CARRY BOTH THIS AND THE MICROSCOPE
SIMULTANEOUSLY, OR SOMETHING WILL DROP. This must be carried with
both hands: one hand to support the transformer and one hand to hold
the lamp so it does not fall out of its supporting cradle.
Make a second trip to pick up the light-and-transformer with
your seat number on it. DO NOT TRY TO CARRY BOTH THIS AND THE MICROSCOPE
SIMULTANEOUSLY, OR SOMETHING WILL DROP. This must be carried with
both hands: one hand to support the transformer and one hand to hold
the lamp so it does not fall out of its supporting cradle.
Once you have both pieces of equipment sitting on your desk,
set up the microscope and lamp as explained, below. Then illustrate
the apparatus, labeling all features whose names are in bold.
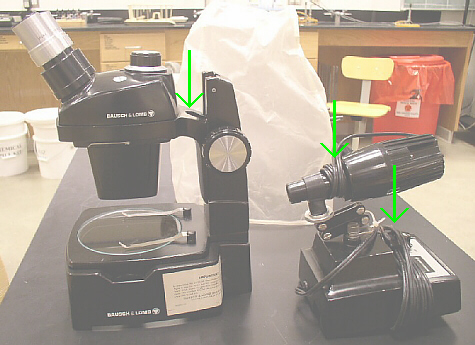
Setting It Up:
- Remove the plastic cover and set it
aside. Raise the optical head by rotating the focusing knob
until the back of the optical head is just above the top of the arm.
- Unwrap the cords from around the
light housing (lamp), and from around the transformer.
Plug the cord from the lamp into the back of the transformer.
Check to make sure that the voltage selector is set to off
before placing the plug into an electrical outlet.
- Decide what light source would be
best for what you intend to view. For
lighting from the top (appropriate for most dissections), insert the light
into the hole in the (top) back of the optical head.
For side lighting, leave the light in its cradle, and adjust the angle as
needed. For bottom illumination (appropriate if you wish to shine light
through your specimen), if your microscope is equipped with a
transilluminator, you may insert the lamp into the back of the
base of the transilluminator.
- Once the light is all set up, turn
the voltage selector to the #1 setting and check to see if the light
went on. If not, first check to see if the red reset button on the outlet
needs to be pushed, and also confirm that all cords are properly plugged in.
If the light still doesnt go on, report it to your professor.
- The first time you use the dissecting
scope, draw a side view of it and draw the light, labeling all
the parts and noting their functions.
Use of Dissecting Scope:
- Place your specimen in the center of
the field of view (if the light is on, use the center of where the light is
visible on the stage plate as a guideline. If its not already there, turn
the zoom knob on the top of the optical head to 1.0. This will give
an effective magnification of 10× since the power of the oculars is 10×.
- Looking only through the right
ocular with the right eye, use the focusing knob to focus on the specimen.
When the image is finely focused, then look through the left ocular with your
left eye, and focus for the left eye by rotating the adjustable left
ocular. Do not turn the focus knob at that point! The specimen should
now be in focus for both eyes.
- Adjust for your own interocular
distance by spreading apart or squeezing together the oculars so that a
single three-dimensional image is seen, with no black areas.
- After you have the specimen in focus,
if a higher power of magnification is desired, adjust for the magnification
of the view by rotating the zoom knob (and then, refocus as needed) so the
desired detail is clear on the specimen. Adjust the amount of light on the
specimen by adjusting the setting (#1, 2, or 3) on the transformer. To help
prolong the life of the bulb, use the lowest transformer setting that is
satisfactory for viewing your specimen. If the lenses need cleaning, use
lens paper only for this purpose.
- Make appropriate drawings. Draw
what your specimen
looks like, indicating the name of the specimen, the magnification of view
(remember to multiply whatever the zoom knob says × 10 because of the oculars),
the preparation of the specimen (live, prepared slide, preserved, cross section,
longitudinal section, etc.) and all appropriate labels.
Storage of Dissecting Scope:
- Turn off the light.
- Unplug the transformer from the
outlet. Unplug the light from the transformer. Carefully wrap the main
power cord snugly around the transformer and tuck in the end so that it
stays put.
- Remove the light from the microscope,
wrap the cord neatly around the light body and tuck in the end. If you have
not done so already, notice that its ring/cradle on the extension arm of the
transformer has one side that is a larger diameter than the other side.
Push the light snugly into the larger side of that ring. Once again using
both hands, carefully carry the light-and-transformer to the kitchen.
Replace it in the correctly numbered location in the cabinet.
- Lower the optical head of the
microscope all the way down as low as it will go (until it almost touches the
base), turn the zoom knob back to the 1.0 setting, place the plastic cover
over the microscope, remember to carry the microscope with both hands (and
dont forget to watch out for the stage plate),
and return the microscope to the correctly numbered location in the cabinet.
Other Things to Include in Your Notebook
Make sure you have all of the following in your lab notebook:
- all handout pages (in separate protocol book)
- all notes you take as you read through the Web page and/or
during the introductory mini-lecture
- all notes and data you gather as you perform the lab
- labeled drawings (yours!) of
- the dissecting scope
- the light and transformer
- answers to all discussion questions, a summary/conclusion in your
own words, and any suggestions you may have
- any returned, graded pop quiz
Copyright © 2001 by J. Stein Carter. All rights reserved.
Based on printed protocol Copyright © 1987, and
photos Copyright © by 2004 D. B. Fankhauser
Chickadee photograph Copyright © by David B. Fankhauser
This page has been accessed  times since 8 Apr 2006.