Maple Sap Collection
and Syrup Production
Please choose one of the links, below.
Background Information:
History
 The production of maple syrup has been an activity of early spring since the
pre-Columbian era in America. American natives would gash the trees,
collect the sap, let it partially freeze to enrich the sap and then boil it
down, sometimes by dropping heated stones into the sap.
The production of maple syrup has been an activity of early spring since the
pre-Columbian era in America. American natives would gash the trees,
collect the sap, let it partially freeze to enrich the sap and then boil it
down, sometimes by dropping heated stones into the sap.
What Kind of Trees?
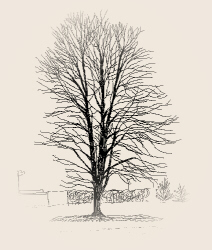 The trees suitable for tapping include all of the maple
family (Aceraceae): Sugar, Silver, and Red Maples as well as Boxelder.
Sugar maple trees can be identified by silvery bark that is rough on the
lower portions of the tree and horizontal branches. Sugar Maple sap contains
the highest concentration of sugar (2% or higher according to conditions).
Boxelder produces a weaker sap, but one which is especially delicious to
drink as is, tasting like a slightly sweet spring water, and making an
excellent base for peppermint tea. Other species of trees may be tapped
including walnuts, hickories, Sycamore, and Sweet Birch. Trees to be tapped
should be at least 1½ feet in diameter, have large healthy crowns, and be
well exposed to the sun.
The trees suitable for tapping include all of the maple
family (Aceraceae): Sugar, Silver, and Red Maples as well as Boxelder.
Sugar maple trees can be identified by silvery bark that is rough on the
lower portions of the tree and horizontal branches. Sugar Maple sap contains
the highest concentration of sugar (2% or higher according to conditions).
Boxelder produces a weaker sap, but one which is especially delicious to
drink as is, tasting like a slightly sweet spring water, and making an
excellent base for peppermint tea. Other species of trees may be tapped
including walnuts, hickories, Sycamore, and Sweet Birch. Trees to be tapped
should be at least 1½ feet in diameter, have large healthy crowns, and be
well exposed to the sun.
Materials Needed:
- spiles
- buckets
- brace and bit (⅜-in) used to tap the trees
- hammer used to tap the trees
- 5-gallon collection carboy with lid (wired onto backpack) used to collect sap
- large clean plastic garbage can (with lid) for a reservoir used to collect sap
- meterstick used to collect sap
- funnel used to collect sap
- collection data sheet used to collect sap
- an evaporator (wide, shallow pan on heat source) used to boil the sap
Procedure:
Tapping the Tree
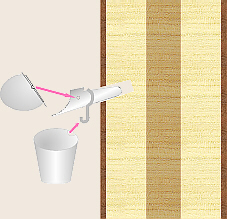
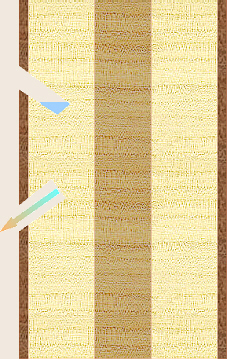 Drill the tapping hole on the south side of the tree. A northern exposure
often will not flow at all early in the season. For commercial spiles, a
⅜-in bit should be used, drilling the hole about 3 feet from the
ground, and 1½ to 2 in. into the trunk, with a slight upward slope (as
shown in the figure to the right).
Drill the tapping hole on the south side of the tree. A northern exposure
often will not flow at all early in the season. For commercial spiles, a
⅜-in bit should be used, drilling the hole about 3 feet from the
ground, and 1½ to 2 in. into the trunk, with a slight upward slope (as
shown in the figure to the right).
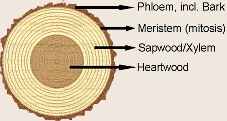
 Note as you drill that the bark
(phloem) is orangish-brown and the xylem is whitish
(xylo = wood, phloeo = the bark of a tree). Avoid tapping
directly above a lower limb or trunk defect (last years
tapping hole?).
Note as you drill that the bark
(phloem) is orangish-brown and the xylem is whitish
(xylo = wood, phloeo = the bark of a tree). Avoid tapping
directly above a lower limb or trunk defect (last years
tapping hole?).
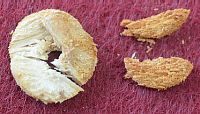
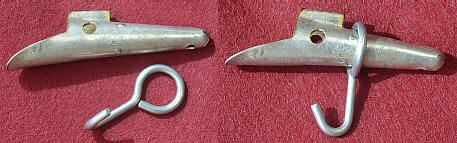 Put a hook on the back of the spile, and tap the spile
into the tree with a hammer (as shown in the figure to the left, below).
A 3-gal sap bucket is hung from the hook on the spile, but when collecting
sap at home where official buckets are not available, many variations are
possible. (The wire on the lid fits through the hole in the spile to hold
the lid on, thus the bucket can be removed without removing the lid.)
If tapping at home, gallon plastic milk bottles may be used, but will have
to be emptied several times a day during a heavy flow. You may place a 5-gal
bucket on the ground if the spile is long enough.
Put a hook on the back of the spile, and tap the spile
into the tree with a hammer (as shown in the figure to the left, below).
A 3-gal sap bucket is hung from the hook on the spile, but when collecting
sap at home where official buckets are not available, many variations are
possible. (The wire on the lid fits through the hole in the spile to hold
the lid on, thus the bucket can be removed without removing the lid.)
If tapping at home, gallon plastic milk bottles may be used, but will have
to be emptied several times a day during a heavy flow. You may place a 5-gal
bucket on the ground if the spile is long enough.
 After the bucket is hung on the hook but before the lid is attached, count
the number of drops per minute each bucket is dripping. This may be
done by counting the number of drops in 30 sec and multiplying by two.
After the bucket is hung on the hook but before the lid is attached, count
the number of drops per minute each bucket is dripping. This may be
done by counting the number of drops in 30 sec and multiplying by two.
 The flow of sap is highly dependent upon weather conditions. Optimum
conditions are nights in the lower 20° F range followed by bright sunny days
in the 40° F range. The flow will stop when daytime temperatures do not go
above freezing, or when night temperatures do not go below freezing. The
flow usually lasts roughly three weeks (more if it gets warm in January, but
the holes may heal shut and need to be redrilled). While it flows, collect
daily in late afternoon (5:00-ish is a good time any earlier and you wont
get all the sap from that day, later and you wont be able to see what youre
doing. You will not get credit for sap collected before 4:00 at the very
earliest). Note that normally xylem carries water up from the roots and
phloem carries the sugar produced by photosynthesis down to the roots to be
stored. The latter is especially true in the fall. In the spring, the
xylem has the unusual job of carrying stored sugars up to the developing buds,
and it is this flow that we tap and harvest.
The flow of sap is highly dependent upon weather conditions. Optimum
conditions are nights in the lower 20° F range followed by bright sunny days
in the 40° F range. The flow will stop when daytime temperatures do not go
above freezing, or when night temperatures do not go below freezing. The
flow usually lasts roughly three weeks (more if it gets warm in January, but
the holes may heal shut and need to be redrilled). While it flows, collect
daily in late afternoon (5:00-ish is a good time any earlier and you wont
get all the sap from that day, later and you wont be able to see what youre
doing. You will not get credit for sap collected before 4:00 at the very
earliest). Note that normally xylem carries water up from the roots and
phloem carries the sugar produced by photosynthesis down to the roots to be
stored. The latter is especially true in the fall. In the spring, the
xylem has the unusual job of carrying stored sugars up to the developing buds,
and it is this flow that we tap and harvest.
Sap Collection
- Obtain a collection data sheet and
record weather conditions and time of collection.
- Starting at the farthest tree first,
at each tree level the bucket on the tree and measure the depth of the sap
by inserting the meterstick to the bottom of the bucket. Record the depth
on the collection data sheet. If the bucket is empty, so indicate.
- Pour the sap into the collection
container (carboy on the backpack) and replace the metal bucket on the hook
so that it hangs straight and the cover is in place. Place the lid on the
backpack carboy and proceed to the next tree.
- Continue measuring and recording the
depths of sap in the metal buckets and replacing the buckets until all trees
have been visited. If the backpack becomes nearly full before you have
finished all the trees, cover it securely with its lid and return to the
reservoir (garbage can) at the school.
- After all sap has been collected (or
if youve returned with a full backpack and still need to go collect more
sap), measure the depth of sap in the backpack and record on the data sheet
(do this for each load if more than one trip is made).
- Pour the collected sap into the
garbage can and determine the depth of sap in the garbage can, recording
this number on the data sheet as well. If necessary, return to collect the
rest of the sap. Collected sap may be held in the garbage can if the
temperatures do not go above 40 to 45° F. If the temperature is warmer than
that, the sap will support bacterial growth and spoil. Normally, the
garbage can should be left in the designated location overnight, and lab
staff and/or sap-boiling babysitters will bring it to the lab the next
morning to boil down the sap.
- Carefully store equipment so that
various instruments are hidden behind the garbage can, securely cover the
garbage can with its lid, and take the completed data sheet with you. Make
sure to indicate weather conditions, times of start and finish, and any
comments relating to conditions of equipment, etc.
- Make copies of the data sheet for
the lab notebooks of the two people who did the collecting and turn in the
original to Ms. Carter to receive credit for collecting. Ms. Carter will be
entering all sap collection data into the computer (unless you help out by
doing it yourself), and the points you receive will be based on those data.
Evaporation
The evaporator may be any large, shallow, metal pan which may
be heated. The larger the surface area of the boiling sap, the more rapidly
it will evaporate. The boiling down requires a great deal of energy. A
LARGE baking pan on top of the stove will suffice. However, due to the
flavor imparted to the syrup, wood is the fuel of choice. A special
wood-fired Fankhauser model evaporator may be fashioned from an inverted
clean garbage can lid and a 5-gallon can with bottom removed (rusted-out,
for instance). Cut a 4×4 in. hole near the top of the can for smoke
release.
Stand two large firebricks up to form the fire box and place
the can on top, with smoke hole up and away from where fire is to be stoked.
Place the garbage can lid on top (upside down) and stabilize. Partially
fill with sap and level lid by moving on can. Fill with sap to within ¼ in.
of top and stoke up a good fire. The lid will hold around 2½ gal of sap
which should be removed to a saucepan to finish off. During the last few
minutes, watch it like a hawk as it will burn very easily at the last
minute, ruining hours of boiling (and your mood). The finished syrup should
have a specific gravity of 1.37 and boil at 104° C (219° F). When it is
nearly-done, it will have oily-looking bubbles, and when its ready, foamy
bubbles will start to rise in the pan. If you want maple sugar, heat until
it boils at 112° C (234° F). (Here in the lab, we will be using whatever
sources of heat we can find gas and/or electric. About 40-60 gallons of
sap are needed to make one gallon of syrup when boiled down.)
The resulting syrup should surpass your expectations. It is
very rich and will go a long way. Try it on cornmeal waffles with butter.
It is the real thing. (Note: there is a Clermont College tradition of
having a waffle breakfast on the first or second Friday of April with maple
syrup from sap collected by biology lab students.)
Some Further Notes on Collecting:
If you sign up to collect sap, you better be there unless you
can agree to get someone else to take your place and do it. A
sign-up calendar
has been placed online, and if your name is there, you better be, too. If
someone takes your place, his/her name needs to appear in place of yours
(let Ms. Carter know ASAP). If sap is not collected on a given day, that
causes problems (like overflow) the next day. No points will be given for
sap collected too early in the day. Sign up for sap collection in pairs.
Both partners will receive the following points for sap collection:
weekdays, first trip 5 pts each person
(second [or more] trip if needed) 5 pts each
weekends (Sat & Sun), first trip 10 pts each
(second [or more] trip) 5 pts each
If one person doesnt show and the other has to do it alone,
that person gets all the points. If no one shows up and sap is not collected,
both people get 5 points deducted (5 pt). On the other hand, if the
weather is REALLY cold and there is no sap flow, you dont need to come in
to check it (and wont get points for an obviously futile hike) if in doubt,
check with Ms. Carter or Dr. Fankhauser first. Please be considerate of
others when signing up for sap collection and dont sign up for more than
your share of days. If you sign up for too many days, some of those times
may be canceled in favor of other students who wish to collect but have
limited scheduling options. If you have someone other than Ms. Carter for
lab, your instructor will be notified of the points you have earned based on
the online data.
Copyright © 2004, 2015 by J. Stein Carter. All rights reserved.
Based on printed protocol and background information
Copyright © 1981 D. B. Fankhauser
and additional information © 1992 J. L. Stein Carter.
Chickadee photograph Copyright © by David B. Fankhauser
This page has been accessed  times since 1 Sep 2011.