Cells & Organelles
Background Information
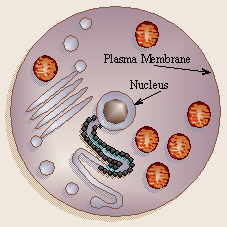
Generic Animal Cell
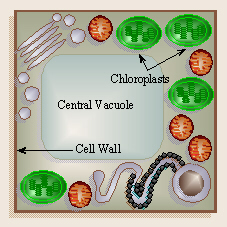
Generic Plant Cell
All living things are made up of cells. Some organisms, like
yeast, are only single-celled, while others, like humans, contain many cells.
Cells are bounded by a plasma membrane which is so thin it is often invisible
even with a light microscope. Cells of organisms such as plants have a cell
wall outside the plasma membrane. The most important organelle (-elle
= small) within eukaryotic cells is the nucleus. Remember that, unlike yeast,
humans, and other such eukaryotes (eu- = good, well, true), bacteria,
which are prokaryotes, (pro = before, in front of; karyon =
nut, kernel, nucleus) do not have their DNA organized into a nucleus. When
a cell is stained, the nucleus often takes dye well, especially in the
region(s) of the nucleolus (pl. = nucleoli). The region between the nucleus
and the plasma membrane is called the cytoplasm (cyto = cell), which
contains a number of other kinds of organelles. Some of these are visible
only with an electron microscope and/or special staining techniques, while
others are easily visible with a light microscope. Various vacuoles
(vacu = empty) are usually visible. Many plant cells have a large
central vacuole which often takes up more space than the cytoplasm. In
plants, chloroplasts (chloro = green; plasti = formed, molded)
are easily seen, as well as various other plastids including leucoplasts
(leuco = white) and chromoplasts (chromo = color). If present,
cilia (cilium = eyelid, eyelash, small hair) and flagella
(flagellum = a whip) can sometimes be seen by their shadow (or with a
special stain), although not in great detail. There are special stains
available to enable us to see certain of the other organelles.
The smallest cells we know of are some bacteria, the largest
are bird eggs, the yolk portion of which is a single cell. The albumen
(alb = white; album = the white of an egg), outer membrane,
and shell are non-cellular products of the hens reproductive tract. The
longest cells we know of are nerve cells. To reach from a humans spinal
cord to toes, a nerve cell has to be about three to four feet long
imagine a giraffes nerve cells.
The Cells You Will Be Viewing
Examine at 40, 100, and 400×; draw; and take notes on the
following materials. Refer to the illustrations in the handout and on your
own drawings, label all parts indicated in the protocol. Each drawing
should be ¼ to ½ page. Do not draw circles around everything, but do watch
relative space and proportion. Use your lab pen to outline drawings and fill
in with color later, if desired. Label with the power of magnification to
the lower right of each picture. Wash and dry your slide and coverslip
between each specimen and when you are done. When you are done for the day,
place your slide in the designated location to dry (do NOT return it to the
box of clean, dry slides) and dispose of the coverslip in the broken-glass
box. UNDER NO CIRCUMSTANCES SHOULD COVERSLIPS BE LEFT IN A SINK OR THROWN
IN THE REGULAR TRASH!
Air Bubble Not a Cell!
Air bubbles are a common occurrence, and are often mistaken for something
important. Those nice, black rings are so easy to draw, but alas, they
are only air bubbles.
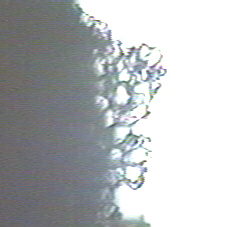
Cork at 40×
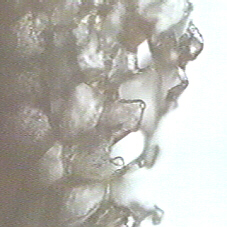
Cork at 100×
In 1663, when Robert Hooke first saw and named cells, he was examining a
section of the bark of the cork oak tree (Quercus suber, which grows
in Europe), and he saw many small chambers which he called cells (cell
= a small room).
From a piece of cork, shave off a VERY THIN slice and make a dry mount
of it by just placing it under a coverslip. Your slice should be thin enough
that you can almost see through it and the coverslip does not rock back and
forth on top of it. Observe whether all the cells you see are the same
size and shape or not. Since this cork was removed from its tree long ago,
these cells are no longer alive. Thus, you wont see cytoplasm or any
organelles. What you will see is the cell walls that surround the
spaces where the cytoplasm and organelles used to be.
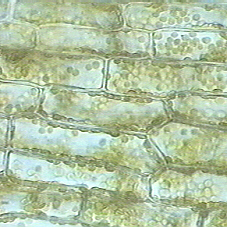
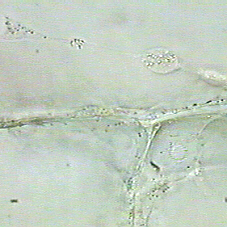
Elodea leaf
Elodea, also known as Elodea densa, Egeria densa,
Anacharis densa or waterweed, is an aquatic plant in the family
Hydrocharitaceae. Its leaves are only two cells thick, making it possible to
easily view those cells and their organelles.
Pick an Elodea leaf. Put it in the middle of a slide with a drop of
the water in which it is living, and put a coverslip on it. Note the cells
that make up the midrib of the leaf and notice that the leaf is 3-D.
Locate one cell (usually ones near the edge work well) to examine more
closely. Draw cells as they appear under the various powers of magnification.
Label the cell wall, cytoplasm (cyto = cell), and
chloroplasts (chloro = green; plasti = formed, molded)
green ovals within the cell, and the very large central vacuole
(vacu = empty) which takes up almost the whole cell, or so it seems.
There actually is very little cytoplasm in a thin layer between the plasma
membrane and the membrane surrounding the central vacuole. You cannot see
the membrane around the central vacuole, but can infer its existence from
the fact that all the chloroplasts are found (and move) only around the outer
edges of the cells. Try to locate the larger, oval, transparent,
nucleus (if you find it its usually difficult to see) within the
cytoplasm. Using the fine adjustment, focus up and down to observe the
central vacuole and the small surrounding layer of cytoplasm. Look for a
region in that cell or another where the chloroplasts are moving, indicating
that cyclosis (cyclo = a circle, wheel; -sis = the act
of), or cytoplasmic streaming, is occurring (as it often does in leaf cells).
You do not need to draw the whole field of view rather, draw a
representative area with a few cells. Note the general size and shape of
the cells and count how many of them it takes to fill the field of view
(length? width?) under both low and high powers.
Potato Tissue
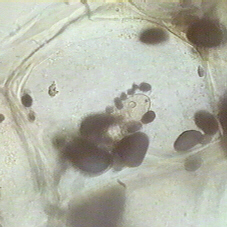
Potato Nucleus Between Stained Starch
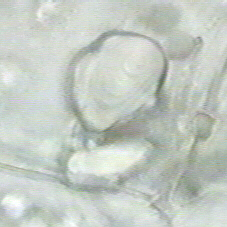
Potato Starch Note Concentric Rings

Potato Starch with Iodine
From a potato, take a small, VERY THIN slice (you should be able to
see through it). Make a wet mount of your slice, examine, and draw. Note
the cell walls and the leucoplasts (leuco = white the
membranes delineating the leucoplasts are not visible) containing starch
grains. Since some cells were cut open, there will be a lot of loose
starch grains. Generally, the nucleus is obscured by the starch
grains, but if you are very lucky, you may see one, especially if you stain
the cell. Examine single starch grains and note the concentric
layers (the light has to be just right).
Iodine, or more correctly, triiodide ions (a solution of which is
brownish-orange in color), reacts with starch to form a purple complex, and
as many people know, potatoes contain starch. Thus, the starch grains can
be stained/highlighted by the addition of iodine to the slide. Remove your
slide from the microscope and drop a tiny drop of iodine to one side
of the coverslip. The iodine will be pulled under the coverslip, but if
necessary, a Kimwipe or paper towel may be touched to the opposite side of
the coverslip to pull the iodine underneath the coverslip. Examine and draw
you potato slice now. Note in your drawing either by words or colored
pencils what colors things are now (especially make note of what color the
starch grains are now). Optionally, try staining a potato slice with
methylene blue to attempt to see the nucleus.
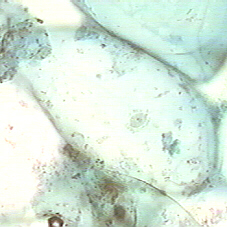
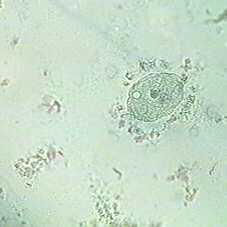
Buccal Smear at 100×
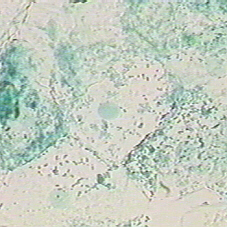
Buccal Smear at 400×
By carefully following directions, make a buccal smear slide as follows.
- Use your fingernail to gently scrape
the lining of your cheek (the oral mucosa), as though you were scratching
an itch on the inside of your cheek.
- Spread this material over
0.5 cm2 in the center of a clean slide make a buccal smear
(bucca = cheek). Remember which side of your slide contains your
specimen!
- Allow it to air dry.
- Fix the slide: when it is dry, pass
it through the flame of a Bunsen burner three times it is not necessary to
bake, scorch, brown, or cook the specimen, just pass it through the flame,
right-side up (it should NOT be too hot to hold). Note: this is not designed
to dry out a wet specimen, either, merely help it to stick to the slide
better (like three-day old spaghetti dried onto a plate). This warming will
fix the cells to the slide so the stain wont wash them off (if you are
careful).
- Place the slide, smear-side up, on a
paper towel and put drops of methylene blue onto the smear to cover it. Let
the stain sit on the slide for exactly one minute (time it), then (over the
sink) tip the slide and allow the excess stain to run off.
- Rinse GENTLY with tap water from one
of the SQUIRT BOTTLES so labeled (NOT under the faucet), shake off the excess
water, and allow the slide to air dry right-side up (you may use a Kimwipe to
dry the bottom and edges of the slide, but do not attempt to blot the area
where the smear is or you will wipe it off).
- You do NOT need and should NOT
use a coverslip with this slide.
Examine and draw your cells. Look for small, usually
somewhat oval or round cells alone or in small groups. If grouped, note how
this affects their shape, making them more hexagonal. Focus up and down with
the fine adjustment to see if you can observe any thickness to the cells.
The nucleus should show up as a darker blue oval or round region near
the center of each cell. Tiny, darkly-stained objects which adhere to the
cell membrane are bacteria which are commonly found in the
mouth. The cytoplasm will be a pale blue. Optionally, if someone
has a lot of interesting bacteria, your instructor may set up a microscope
to view them with the oil immersion lens at 1000×. Note how flat or rounded
these cheek cells appear to be can you relate this to their function as a
lining layer of cells? What is the ratio of the diameter of the nucleus to
the overall diameter of these cells? Again, how many cells does it take to
span the field of view?
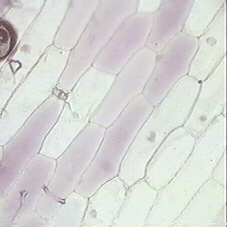
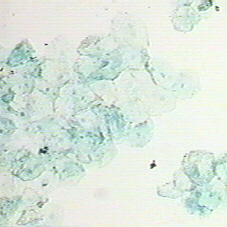
Onion at 100×
Onion at 400×
Peeling Onion Epidermis
Each layer of an onion consists of a thick, fleshy layer sandwiched between
two shiny, transparent, membranous, epidermal layers.
Peel a small piece of the transparent epidermis from a layer of an onion
(NOTE: YOU DO NOT WANT the whole, thick, fleshy part, just the
transparent skin layer). Place it on a slide with a drop of water, then
put the coverslip on. Drop a small drop of methylene blue at one edge of
the coverslip (the dye should be pulled under the
coverslip). Examine and draw the cells. If you have the correct epidermal
layer, you should be seeing long, thin cells. If youre seeing mostly
round-ish or square-ish spongy-looking cells, you have too much of the
middle, fleshy layer of the onion, and not the epidermal layer, so make
another slide, and try to get just the shiny, skin layer. Pick several
cells to examine in more detail and draw. Focus up and down with the fine
adjustment to see the third dimension of the cells. Label the thin cell
walls between cells, the nucleus, which should have stained dark
blue and which may contain one or more even darker blue nucleoli (sing. =
nucleolus), the central vacuole which, again, takes up most of the
cell (this vacuole contains watery sap and is separated from the rest of
the cell by a membrane that cannot be seen without special stain), and the
scant cytoplasm which may be found especially near the edges and
corners of the cell, as well as occasional streaks across the cell you may
be able to see cytoplasmic streaming, as evidenced by movement of the
various organelles within the strands of cytoplasm. As a reminder, you
may have to adjust the iris diaphragm or light level to get optimal contrast.
Note how many cells it takes to fill the field of view lengthwise and
widthwise.

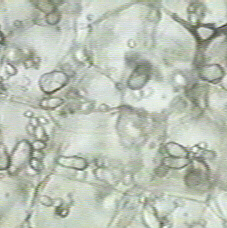
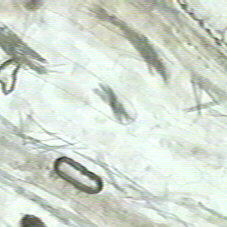
Yeast, unstained
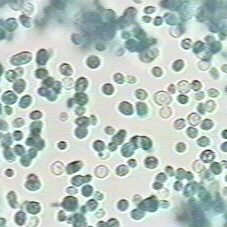
Yeast with Methylene Blue
Place one drop of yeast solution on the center of the slide and add a
coverslip. Examine your slide under 40, 100, and 400× (ALWAYS START AT 40×
= 4× objective). Draw what you see at each power. Remember to make your
drawings large enough. Carefully focus up and down with the fine adjustment
to observe the fact that these cells are three-dimensional (adjustment of the
iris diaphragm and rheostat may help you to see this better. Yeast cells
should be fairly oval in shape. How much size variation can you see? Do you
see any cells with reproductive buds attached? Can you see any of the
organelles within the cells? Yeast cells do have a thin cell wall and clear
cytoplasm. The nucleus cannot be seen unless special staining techniques are
used. After observing the cells unstained, add a small drop of methylene
blue by removing the slide from the microscope and dropping a drop of
methylene blue next to one edge of the coverslip.
Again, examine under each power and draw what you see. What difference(s)
does the methylene blue make in the visibility of the yeast cells or their
organelles? Note any other observations (for example, have all of the cells
taken up the dye equally?).
Additional, Optional Cells to Examine
Also look at these slides if they are available and theres time.
Tomato Pulp at 100×
Tomato Cell with Nucleus
From a tomato (or red pepper), take a bit of the red pulp or tissue
beneath the skin (NOT the skin itself). Gently spread it out a bit
on your slide and make a wet mount. You should not have a big, red blob on
the slide, because you wont be able to see anything that way. Rather, the
smear should be thin enough that you can just barely see it. Examine under
low power and draw, then under high power and draw. Note whether cells that
are still attached to each other and cells that have come free from the rest
are the same shape does being in contact with other cells influence the
shape of a cell? Locate the cell walls. Notice the small,
rust-colored chromoplasts (chromo = color) which give the
tomato its color and are located in the cytoplasm (of which, once again,
there is very little). The majority of the cell is a central vacuole
and the cytoplasm will appear as thin streaks of grayish or speckled
matter. Optionally, stain with methylene blue by putting a drop at the edge
of the coverslip and if needed, drawing it through by touching the other
side with a Kimwipe. DONT GET METHYLENE BLUE ON THE MICROSCOPE!!!
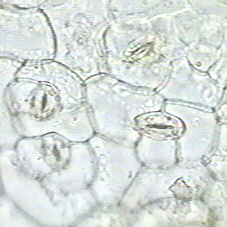
Broccoli Epidermis
Tear a broccoli, kale, or geranium leaf sideways so that a portion of the
lower (clear) epidermis (epi = upon, over; derm = skin) is
exposed. Cut this off with a razor blade or scalpel (or tear off with your
fingernails) and make a wet mount of it. Observe and draw. Label
epidermal cells (clear and irregular in shape), their cell
walls, and the smaller, oval areas that resemble cat-eyes which consist
of a pair of crescent-shaped guard cells surrounding a small opening,
the stomate (stoma = mouth). The stomates are used for
exchanging CO2 and O2 with the outer air. The guard
cells control the size (opening and closing) of the stomate, closing it in
dry weather to conserve water. Notice the green chloroplasts in the
guard cells. On your slide, you may also see a few larger, rounded, green
(due to chlorophyll) mesophyll cells (meso = middle;
phyll = leaf), some of the cells from the middle of the leaf that
have come off with your epidermal layer.
Moses-in-the-Boat crystas at 40×
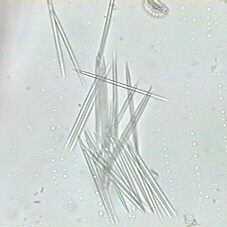
Moses-in-the-Boat crystals at 100×
Moses-in-the-Boat (Rhoeo spathacea) in plant family Commelinaceae gets
its common name from the fact that the clusters of flowers are borne in a
boat-shaped pair of specially-modified leaves. These flowers have three,
tiny, white petals, and like several other related plants, the petals contain
crystals of calcium oxalate (similar to the oxalic acid that gives the
plant Oxalis its taste and name). Other parts of the plant
occasionally contain these crystals, too, but typically not as many as in
the flower petals. These crystals, which look like pick-up sticks or
knitting needles, are primarily an excretion product of the plant and are
stored in the central vacuole.
If enough flowers are available, make a wet mount of a petal of a
Moses-in-the-Boat flower petal. If not enough are available for everyone to
make mounts, the instructor should set one up as a class demonstration.
The cells of these flower petals contain long, slender crystals of
calcium oxalate (oxa = sharp, acute, acid) in their central
vacuole. Also, notice the cell walls. Due to the fact that some
cells were torn open when the petal was removed from the flower, you may also
see bunches of crystals that have escaped and are out by themselves.
Draw and label what it looks like.
Other materials and/or prepared slides may be available, and
if so, examine and draw. If available and time allows, examine a drop of
pond water to see what lives there (draw). Alternately, your instructor
may decide to show you how to find and view eyelash mites.
Other Things to Include in Your Notebook
Make sure you have all of the following in your lab notebook:
- all handout pages (in notebook or separate protocol book)
- all notes you take during the introductory mini-lecture
- all notes and data you gather as you perform the experiment
- drawings (yours! at whatever power works best for that tissue) of each
tissue examined, to scale (proportions relative to each other are
about right) with all visible organelles and all powers of
magnification labeled (cork bark, buccal smear, Elodea leaf,
potato pulp, onion epidermis, tomato pulp, kale leaf,
Moses-in-the-Boat flower, etc.)
- answers to all discussion questions, a summary/conclusion in your
own words, and any suggestions you may have
- any returned, graded pop quiz
Copyright © 2010 by J. Stein Carter. All rights reserved.
Based on printed protocol Copyright © 1980 D. B. Fankhauser
and © 1988 J. L. Stein Carter.
This page has been accessed  times since 18 Dec 2010.