Maple Sap Collection Instructions
Procedure:
Once the trees are tapped, it is necessary that someone go out
every evening to collect that days sap. People who want to help collect
sap should plan on doing so around 5:00-ish, so all the sap from that day is
collected, and little to none is left for the next day. Two people may sign
up to go out together (highly recommended hiking alone on slippery, muddy
ground is not a good idea) for each day. Here is the procedure to follow:
- If you have not already done so, it
is necessary to first
sign up for sap collection.
That will also allow you to check to make sure someone else hasnt already
signed up, will allow other students to know what days are available, and
will allow faculty and staff to see whos scheduled.
- Make sure you have contact information
(phone &/or e-mail) for your sap-collection partner. (Note: when you
sign up online, as you submit your data, the Web page will attempt to open
a mail-to window to send you each others e-mail addresses. Please send
that message so you both have the other persons address.) That way, if
something comes up, you can get in touch with the other person. Also, make
sure the two of you agree on a time to meet.
- Plan on meeting outside the front
(courtyard-side, not greenhouse side) door of the McDonough building. The
equipment you will need is located to the left of that door, as you face the
building.
- The equipment that should be there
includes:
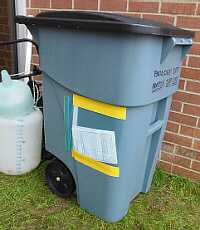
- a large, gray garbage can
if its a weekday and the can is not there, it may still be up in the
lab kitchen, so please check up there

- taped onto the side of the can, a plastic
bag containing copies of the sap-collection sheet if there are only a
few left, please notify Ms. Carter
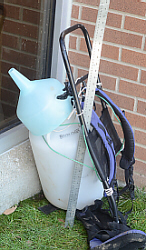
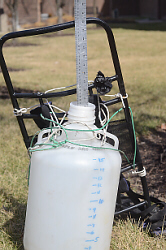
- a backpack with a 5-gal carboy wired onto
it
- a metal meterstick
- a blue-green funnel
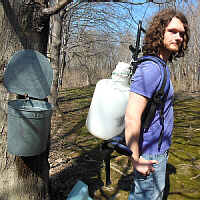
- You will need to take with you the
backpack, the funnel, the meterstick, and ONE copy of the sap-collection
sheet. Record your names, seat numbers, the date, day of the week, and your
start time on the sap-collection sheet.
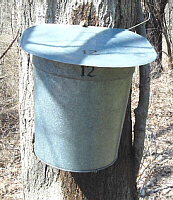
- The 12 buckets from which you will
be collecting sap are located along/near North Maple Creek, to the west of
the front circles and flagpoles, and to the north of the west parking lot.
(Click this image for a larger version.)
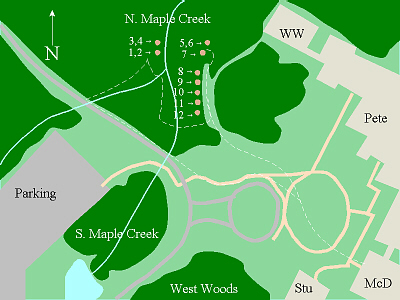
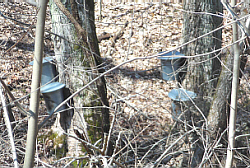
- Start collecting from the
farthest-away buckets, first, so you have the heaviest load to carry the
shortest distance.
(This photo shows buckets 1 through 4 as viewed
from across the creek near bucket #8.)
- At each bucket:
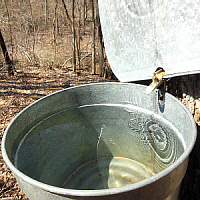
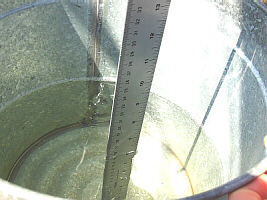
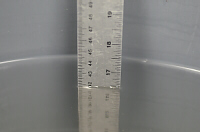
- Tilt the lid up and insert the
meterstick into the sap, 0-cm end down. Read the depth of sap in that
bucket (to 1 decimal place will suffice), and record it in the appropriate
box on the sap-collection sheet.
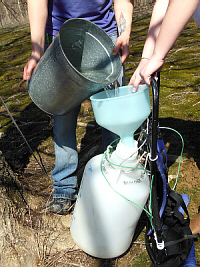
- Lift the bucket off the hook,
remove the lid from the carboy on the backpack, and
use the funnel to guide the sap as you pour it into the carboy.
- Replace the bucket onto the hook
and lower the lid so it is centered over and covering the bucket. Replace
the lid on the carboy.
- Gather all equipment before
moving on.
- Repeat the steps, above, for each
bucket either until the carboy becomes full or until you have finished all
the buckets.
- If at any point the carboy becomes
full, take it back to the garbage can. Measure the depth of the sap in
the carboy, record that number in the appropriate place on the sap-collection
sheet, then pour the sap into the garbage can. Return to the woods to
collect the rest of the sap.
- When you have collected sap from all
12 buckets, return to the garbage can. Measure the depth of the sap in
the carboy, record that number in the appropriate place on the sap-collection
sheet (note: if it was necessary to make multiple trips, you will have several
numbers entered into that space please add them together to get a total),
then pour the sap into the garbage can (note: if you are collecting sap on
a Sunday after a good weekend, there may not be room in the garbage can,
so you may need to leave your newly collected sap in the carboy).

- After you have place all the sap you
collected into the garbage can, also measure the depth of sap in there,
and record that onto the data sheet.
- You do not need to measure the
temperatures indicated on the data sheet, but if you happen to know the
current air temperature, including that could be useful. Do make sure to
include the names of both people and at least one persons seat number.
Circle the word that best matches the existing weather conditions.
Record your stop time and number of trips on the data sheet.
- Make sure the lid is placed securely
onto the garbage can, and make sure that you have returned ALL the equipment
behind the can.
- As soon as feasible, go to a computer,
go online, and
submit
an electronic copy of your data.
- If your professor requires you to
put a copy of your sap-collection sheet in your lab notebook, as soon as
possible either xerox a copy of your original data sheet for each person or
just before/after you submit your data online, print out a copy of the online
data sheet for each person.
- Give your original sap-collection
data sheet to Ms. Carter (so we can make sure to gather all the data from
all sap collection this season). Depending on what instructions your
professor has given you, you may either turn the data sheet in to him/her to
pass on to Ms. Carter, or give it to her, directly.
Points (Ms. Carters Students):
Each instructor will determine his/her own way of awarding
any points for sap collection. Here is a description of how Ms. Carter will
assign extra-credit points to her students.
- For a weekday, each of the two students
will receive 5 pt per legitimate trip (2× carboy a fourth- or
half-full doesnt count as 2 trips).
- For a weekend (Sat or Sun), each of the
two students will receive 10 pt for the first trip, and 5 pt for every
additional trip that is needed.
- If either only one person signs up, or if
one of the two does a no-show, the one person who did all the work gets all
the points. However, if one person shows up early, with the intent to
double-cross his/her partner, that will earn that person 5 points per
trip that was made.
- If the weather is right and there is sap
to be collected, but both people do a no-show, both will receive 5 points.
If it is raining (unless its a dangerous storm with really heavy
rain and/or lightning), and youve signed up to collect sap, you need to do
so.
- However, if the weather is either way too
cold (like, if we get a late freeze/snow) or (eventually) way too warm, such
that the sap is not flowing, then it is not necessary to come collect sap.
Then, you will not get points deducted (nor will you get any points added).
Also, if youve signed up for a day late in the sap season, and due to
cessation of sap flow, we need to pull all the buckets in before that date,
you will not need to show up that day, nor will you be awarded any points.
- Points will only be awarded if Ms. Carter
has received a copy (the original) of your data sheet. No data sheet = no
proof that you went out and collected sap = negative points.
- While these extra-credit points may help
your grade in this course, they will not replace actually being in lab,
doing the required lab work, and doing well on the tests and quizzes.
Thus, as final grades are calculated, that will be done in such a way that
sap points will not raise your overall grade more than one letter-grade
for example, your grade might go from a C to a B, but never from a C to an
A. Also, realizing that some students are unable, for whatever reason,
to go out and collect sap, the class curve will be calculated prior to
adding in the sap points, so that those students are not penalized.
Copyright © 2015 by J. Stein Carter. All rights reserved.
Chickadee photograph Copyright © by David B. Fankhauser
This page has been accessed  times since 10 Mar 2015.
