Use of pH Meter and pH Paper
What is pH?
Water is a key ingredient in all life. Cells are 70 to 95%
water. About 75% of the Earths surface is covered with water. Water is the
only common substance existing naturally in all three forms: solid, liquid,
gas.
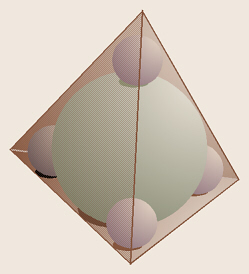
The shape of a water molecule is a tetrahedron. Oxygen has
six valence electrons and two holes, thus can bond with two hydrogens.
Therefore, the chemical formula for water is H2O. Oxygens other
four valence electrons, in two pairs, are not bonded to any other atoms, thus
these are referred to as unshared pairs of electrons. Oxygen shares
electrons with hydrogen, but pulls just a little harder on the electrons.
The electrons are just a little closer to the oxygen than the hydrogens, so
this is called a polar covalent bond.
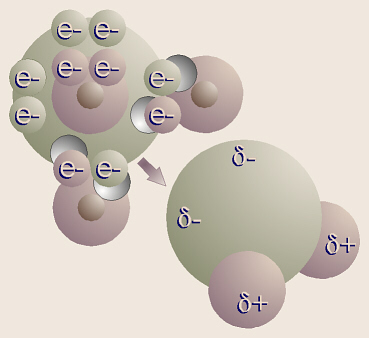
Note that even though the molecule as a whole is electrically
neutral (the + and charges balance), the ends of the molecule where the
hydrogen nuclei are (which contain only a proton) have a sort-of positive
charge, and the ends of the molecule by the unshared pairs of electrons are
sort-of negative. The sort-of positive ends on one water molecule are
attracted to the sort-of negative ends on another water molecule. This is
called hydrogen bonding. Actually, hydrogen bonding can happen with
other molecules besides water.
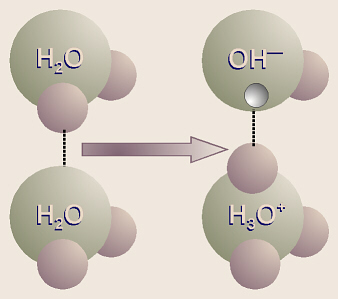 Even in plain, distilled water, because of the hydrogen bonding,
sometimes one of the hydrogen protons from one water molecule jumps over to
one of the pairs of unshared electrons in another water molecule (leaving its
electron behind). Thus it can be said that the first water molecule has
dissociated, and ions of H3O+ (hydronium ion)
and OH (hydroxide ion) are formed. This reaction would be written
as
Even in plain, distilled water, because of the hydrogen bonding,
sometimes one of the hydrogen protons from one water molecule jumps over to
one of the pairs of unshared electrons in another water molecule (leaving its
electron behind). Thus it can be said that the first water molecule has
dissociated, and ions of H3O+ (hydronium ion)
and OH (hydroxide ion) are formed. This reaction would be written
as
2H2O → H3O+ + OH.
Chemists have found that in one liter of pure, distilled water, there will be
0.0000001 M each of H3O+ (often written as H+)
and of OH present.
If other substances are added to water, the concentrations of
hydrogen (hydronium) and hydroxide ions (notated as [H+] and
[OH]) may change. Thus, various solutions have varying
concentrations of hydrogen ion, H+, and hydroxide ion, OH.
However, pH is always based on the hydrogen ion concentration, [H+].
If [H+] is greater than 0.0000001 M, (for example,
0.0001 M or 104 so pH = 4), that solution is an acid, and if
[H+] is less than 0.0000001 M, (like 0.0000000001 M or
1010 so pH = 10) the solution is a base.
Rather than having to write out all those zeros, chemists
came up with the concept of
pH
as a shorthand way to keep track of how much H3O+ is
present in a solution. First, the 0.0000001 M (in the case of plain water)
is converted to scientific notation, so becomes 1 × 10⁷. Next
the exponent or logarithm of that number is found the logarithm of
1 × 10⁷ is simply 7. Then, for convenience, chemists have
defined pH as the negative logarithm because most of
the H+ concentrations with which they deal are less than one (for
example, 0.1 M, 0.01 M, etc.).and its easier if all the numbers are positive
(whereas the logarithms all are negative). Thus, in this case, the negative
() sign is removed, resulting in a positive 7. This, then, is the basis
of pH units.
pH is defined as, is equal to, the negative logarithm of the
hydrogen (hydronium) ion concentration which can be expressed
mathematically as
pH = log[H+].
([ ] means the concentration of). This means that if a solution
is an acid, the pH is less than 7 and if its a base, the pH will be greater
than 7. Note that because this is a logarithmic scale, a change of one pH
unit represents a 10× change in H+ concentration. Thus, going
from pH 1 to pH 2 is going from an H+ concentration of 0.1 M to
0.01 M, and this could have a profound effect in an organisms body.
Chemists figured out that [H+] × [OH]
(concentration of H+, expressed in molarity, times the
concentration of OH) always equals 1014.
Thus, if a solution is neutral, neither acid nor base, we would expect the
concentrations of H+ and OH to be equal, each at
1 × 10⁷ M.
If the concentration of H+ in a solution increases (an acidic
solution), the concentration of OH automatically decreases
proportionately so the product of the two will always be 1 × 10¹⁴,
and if the concentration of OH in a solution increases (an
alkaline or basic solution), the concentration of H+ automatically
decreases proportionately so the product of the two will still be
1 × 10¹⁴. As a reminder, when working mathematical problems like
0.0000001 × 0.0000001, it is easier to use scientific notation to write it as
(1 × 107) × (1 × 107) and add the exponents to figure
out the product, i. e., (7) + (7) = 14,
so (1 × 107) × (1 × 107) = 1 × 10¹⁴.
You may remember from high school math that logarithms can be used to find
answers to multiplication problems, and essentially, this is what we have
just done, i. e.,
| if |
(1 × 10⁷) |
× |
(1 × 10⁷) |
= |
1 × 10¹⁴ |
| then |
log(1 × 10⁷) |
+ |
log(1 × 10⁷) |
= |
log(1 × 10¹⁴) |
| or |
(7) |
+ |
(7) |
= |
(14) |
Why Is That Important to Biology?
Many biological processes are dependent on the pH or hydrogen
ion, H+, concentration of the surrounding solution. Perhaps most
notably, the processes of photosynthesis and cellular respiration, which
respectively, harvest/store energy and release energy for use in a cell,
depend on a difference in the pH on two sides of a biological membrane in
order to function. Acid foods like sauerkraut and pickles do not spoil
easily because many pathogenic (pathos = disease, suffering;
gen = bear, produce) bacteria do not grow well in acidic conditions.
Lemons taste sour and soap tastes bitter to us, in part, because of their
respective acidity or basicity (alkalinity). Our digestive tract mouth,
stomach, intestines, etc. changes the pH of our food from acid to base and
back several times as it is digested. Our scalp and skin are normally
slightly acidic, and that helps ward off lice and infectious bacteria, whereas
people who wash their hair too often and/or shower too often with very hot
water and lots of detergents are more prone to lice infestations and/or
bacterial skin infections or other skin problems.
Safety Considerations for This Lab
- Federal law says that all acids and
bases must be neutralized to pH 7 before disposing of them down the drain,
and they must be washed down the drain with lots of cold water. With
your instructors approval, you may mix some of your substances together
to neutralize them: for example, soft drink, vinegar, or lemon juice could
be mixed with detergent. UNDER NO CIRCUMSTANCES SHOULD BLEACH (CLOROX)
BE MIXED WITH AMMONIA!!! This combination will release toxic
chlorine gas. Test your mixture with pH paper to make sure it is pH 7 before
disposing of it.
- Clean window cleaner, etc. obtained
from here in the lab may be placed back into the original containers for
future use. Any substance that might, potentially, be used as food should
be disposed of after testing, and should not be returned to its
original container.
- Please take left-overs of any
chemicals you bring in to test back home with you. Because we must inventory
and properly dispose of any chemicals here at the College, having extra
chemical waste lying around causes a lot of extra work for the lab staff.
- For this lab, play it safe and
do not use concentrated, strong acids or bases such as toilet
cleaner or drain cleaner. The acidity of vinegar and the alkalinity of
soap are different enough to get the point across.
- If you are dealing with concentrated
acids or bases and/or are working in a situation where some acid or base
could splash, you should be wearing goggles. We have goggles available in
the lab area, so if you dont see them around, check with your instructor or
the lab manager if you need or want to wear them. Goggles may not be
fashionable, but they sure beat going blind (or having to endure the
eye-wash).
- If you get a concentrated acid or
base on your skin, immediately rinse the area off with lots of
cold water and notify your instructor. Strong bases can be neutralized with
vinegar, and strong acids with baking soda. For large spills, notify the
lab staff so they can assist with proper clean-up.
- Our MSDS books are available in the
lab area, and you are welcome to use these at any time to find information on
health and safety precautions when working with various chemicals. If time
allows, you might try looking up some of the chemicals youre testing to see
if theyre in the books, and if so, what the sheet has to say about
it/them.
What Kind of Samples May Be Tested?
You may bring samples to be tested within the following
stipulations/guidelines:
- Samples must be water-soluble.
Inappropriate items include those which coat and dry onto the
electrode (hairspray, white-out, mascara), oily/fatty substances (hand
lotion, butter, furniture polish) which coat and gum up the electrode,
and solvent-based substances (fingernail polish remover, perfume).
Rather, all substances must either be a water-based liquid, or a dry
substance which can (and will have to be) dissolved in water.
- Also, thick substances such
as liquid detergents, shampoo, and jelly/jam should be avoided (or at
least should not be used full-strength) because even though
they are, in theory, water-soluble, they also can coat the electrode
and be extremely difficult to remove.
- Examples of substances which
are OK include such things as yogurt, buttermilk, milk, ice
cream, sauerkraut, distilled water, well water, mineral water, tap
water, baking soda, baking powder, cream of tartar, vinegar, salt,
sugar, various fruit juices, soft drinks (compare flat to fresh?),
coffee, tea, herb tea, vitamin C, Tums, Rolaids, etc. Milk of Magnesia,
aspirin, Tylenol, etc., dilute solution(s) of HCl or NaOH (lye),
urine (compare fresh to stale?), saliva, soil sample(s), ammonia, laundry
or dish detergent (diluted), Windex, Ivory or other soap, Clorox, other
cleaning supplies, etc.
- Please note that some
household chemicals including toilet bowl cleaners (Vanish) and drain
cleaners (Drano) are extremely concentrated, strong acids (Vanish) or
bases (Drano), to the point that they really arent safe to handle
without goggles, gloves, lab aprons, and special training. Also,
unlike your home, Clermont College falls under certain federal
regulations which prohibit drain disposal of these concentrated acids
and bases without first going to a lot of trouble to neutralize them.
Thus we would ask that you please NOT bring samples of them to
test.
- Our lab staff will make some
chemicals available for testing, but this is typically only a small
and boring variety of cleaning supplies, so this lab will be much
more interesting if you bring a variety of substances to test because
they are of interest to you. Within reason, use your imagination.
Preparation of Samples to Be Tested
- Thin liquids may be used as is or
may be diluted (record how much substance and how much water were mixed).
Thick liquids like dish detergent, shampoo, Milk of Magnesia, and possibly
yogurt must be diluted with distilled water and thoroughly mixed until
thin enough to easily rinse off the pH meter electrode. If you do need to
dilute something, record this in your notebook because this does, of course,
change the H+ concentration.
- Items like fruit will need to be
squeezed, juiced, or blended (and put through a strainer if needed) to
extract the juice.
- Solid substances need to be dissolved
in dH2O. If needed, a mortar and pestle may be used to crush and
grind substances into a powder. When adding water, record exactly how much,
either by volume or weight, of your substance and how much water were used.
(For example, add about 20 mL of water to 1 g of a sample will give you
about a 5% solution. Once again, record your data in your notebook because
dilution changes the pH of a solution.
- For any liquids or solutions, you may
wish to test further the effect of dilution on pH. For example, by measuring
5 mL of your solution in a graduated cylinder, then diluting to 50 mL, you
will obtain a 1/10 dilution (which would be expected to change the pH by one
unit). Pour the resulting solution into a clean small beaker to determine
the pH.
- Substances like Tums and Rolaids are
buffers, that is they minimized the change in pH from their
pre-determined, normal value. Thus, if you add acid or base to a solution
of one of them, you would not expect the pH to change very much an
interesting experiment to try. They neutralize stomach acid because they
are at a nearly-neutral pH and do not allow much variation from that
point. Looking at it from the other side, if you start by measuring the
pH of a solution of acid or base, then add an antacid to it, you might
expect to see the pH become more neutral, closer to pH 7. Thus, it might be
of interest to try before and after readings when adding antacids (Tums,
Rolaids) to 0.1 M HCl or other acid.
- Make sure you label all beakers of
samples as you make them up and dispose of them properly. That way, someone
wont accidentally stick their fingers in something. Besides, a) your mother
doesnt work here, and b) UCs Health and Safety people get really upset
about safety violations.
Use of pH Paper
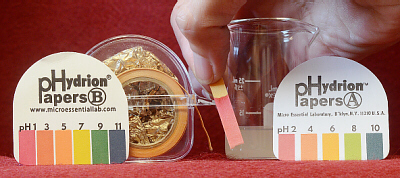 There are different ways of measuring the pH of a solution.
The first is with pH paper. These paper strips have been impregnated with
special dyes that change color as the pH changes. Different dyes are
sensitive to (change color at) different pH ranges. Most indicator papers
have a mixture of dyes so that they are sensitive to a wider pH range. Note
that pH paper is not the same as litmus paper litmus paper only
changes pink-purple to indicate acids vs. bases.
There are different ways of measuring the pH of a solution.
The first is with pH paper. These paper strips have been impregnated with
special dyes that change color as the pH changes. Different dyes are
sensitive to (change color at) different pH ranges. Most indicator papers
have a mixture of dyes so that they are sensitive to a wider pH range. Note
that pH paper is not the same as litmus paper litmus paper only
changes pink-purple to indicate acids vs. bases.
Tear no more than 5 cm (2 in) of paper off the roll
be conservative and dont take more than what you need trying not to
let the end go inside the case. Dip about 2 cm (½ to ¾ in) into the fluid
to be tested. Compare the color with the chart on the roll. Check both
sides of the color chart because there may be some slight variation in your
test sample. Be careful not to get sample on your fingers, especially if
its something caustic. Record the pH in your notebook. Optionally, when
dry, your pH paper strips may be fastened into your notebook as well.
Otherwise, dispose of them in the trash, and do not leave them on the lab
table or the floor.
The Parts of the pH Meter
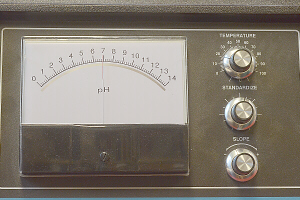
- Here is an overall photo of one of
our pH meters. On the left side of the front of the pH meter is the
scale or face on which you read the pH of the substance being
tested. On the upper right is the temperature knob, in the middle
right is the standardize knob, and on the lower right is the slope
knob. In the center of the upper back of the pH meter is a toggle
switch labeled pH and sta.by. The wires from a separate
combination electrode are plugged into the pH meter, and the
electrode, itself, is soaking in a beaker of pH 7.00 buffer solution.
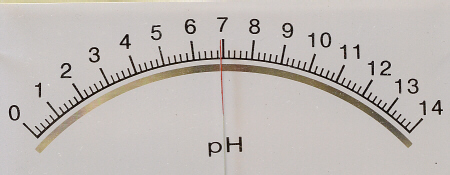
- The face or scale is
marked from pH 0 to 14. Note that there are four subdivisions between each
pH unit, and thus each of those marks would represent 0.2 of a pH unit. Thus,
for example, a pH of 4.30 would be exactly in the middle of the white space
between the 4.20 and 4.40 marks, and if the needle would be ¼ of the
way between the 4.20 and 4.40 marks, that would correspond to a pH of 4.25.
You must read the pH meter to two decimal places.
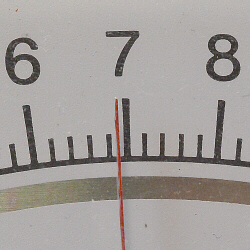
- Notice the mirror under the
numbers. It is there to help you avoid parallax error and insure that you
are looking straight at the needle when reading the meter. If you are
looking straight at the needle, you will not be able to see its reflection
in the mirror.
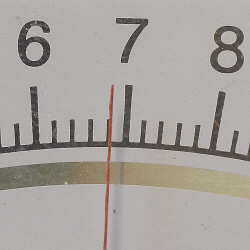
- However, if you are looking at the
needle from an angle, you will be able to also see its reflection,
and that is an indication that the reading you appear to be viewing is
incorrect.
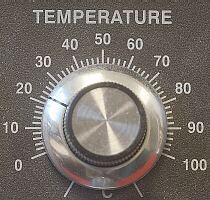
- The temperature knob must be
set to room temperature before standardizing the machine or obtaining pH
readings (Ideally, if you are trying to determine the pH of a solution that
is a lot hotter or colder than room temperature, the machine should be
adjusted to the temperature of the solution being tested). Failure to
correctly compensate for temperature will result in incorrect data. Room
temperature may be determined by using a thermometer. Notice that the
temperature knob says it is marked in degrees Centigrade, that the numbers
represent 10° C divisions, and that there are four lines between each number.
Thus, if room temperature is 23° C, the temperature knob would be set
half-way between the 22 and 24° C marks.
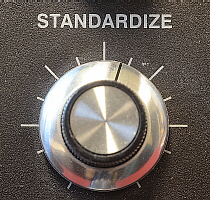
- The standardize knob and
slope knob are used to calibrate the pH meter. First, with the
electrode soaking in a standard pH 7.00 buffer solution, the standardize
knob is used to adjust the scale to read exactly 7.00.
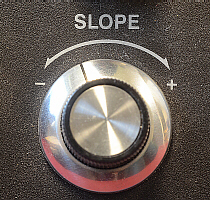
- Then, using a standard pH 4.00 (or
pH 10.00) buffer solution, the slope knob is used to adjust the scale
to read exactly 4.00 (or 10.00).
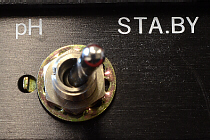
- The toggle switch is used to
switch the pH meter from standby (on, but waiting) to read (electrical
current is flowing) mode. Attempting to send current through the electrodes
(flipping the toggle to pH) while the combination electrode is not
in a solution (like, if its up in the air) can temporarily or permanently
damage the combination electrode, causing erratic or meaningless pH readings.
It is critically important to make sure the toggle switch is on sta.by
(standby) before lifting the electrode out of a solution and as part of
your clean-up routine when you done obtaining your readings.
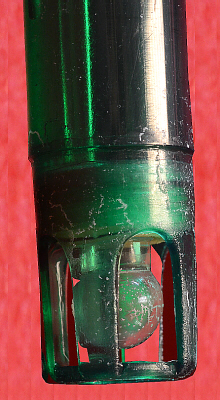
- A pH meter has two electrodes,
because as you may know, it takes
two electrodes for electricity to flow, and pH meters are no exception.
Older pH meters were equipped with two separate electrodes, both of which
were lowered into the solution to be tested. Newer meters have a
combination electrode, which conveniently contains both electrodes in
one, slender housing. For this reason, our meters may appear to have
only one electrode attached, but if you look at the other end of the wire
lead, you can see that there are, indeed, two wires which attach to the
meter. One of those electrodes is an extremely thin (and fragile!), round
glass ball (visible on the bottom end of the electrode, and often semi-protected
by plastic projections from the housing) which is permeable
only to H+ ions.
Hydrogen ions from the solution can cross this thin glass membrane, thus
causing a very small electrical current which is detected by the machine.
At different H+ concentrations, different amounts of H+
ions cross the glass membrane, thus the machine can read different
H+ concentrations, and the face of the meter shows this in terms
of pH units. Please note that these glass electrodes are very thin and
fragile and quite expensive. Thus, you must exercise great care in using the
pH meter. A combination electrode will have a small whitish spot on one side
just above the glass electrode (in some of the very newest combination
electrodes this may be in a position where it is less apparent). This is the
other electrode (the calomel electrode), and it is important that this spot
be below the surface of your solution for the machine to correctly measure
the pH of the solution (for that reason, it is suggested that you use the
smallest beaker possible to hold your solution so that it is possible to
have sufficient depth of solution while keeping the actual volume needed to
a minimum).
Note: the glass electrode
is clear in color. In this photo, it looks green and red only due to
reflected light from the green electrode housing and the red background.
Illustrate a pH meter, labeling the various knobs.
Pay special attention to getting the actual face of the meter
drawn correctly, including the actual markings, the needle, and the mirror.
Make sure to correctly indicate the numbers/divisions on the scale. Observe and draw the various knobs and the toggle switch on
the machine, paying close attention to the labels for the Temperature,
Standardize, and Slope knobs and any divisions/markings on the knobs.
Use of the pH Meter
Your instructor will demonstrate proper use and care of the pH
meters. Please observe carefully and take good notes in your lab notebook
so you know how to operate the machine (and get a reliable reading) without
breaking it.
The electrode(s) have been soaking in pH 7.00 buffer and the
machine has been warming up for at least 30 min. Notice that the beaker in
which the electrode is soaking is labeled as containing the buffer. Locate
the beaker which should be nearby that is labeled WASTE, a smaller beaker
that is labeled as containing either pH 4.00 or pH 10.00 buffer, the
squirt-bottle labeled dH2O, and a box of Kimwipes. Note that
while the buffer is not extremely dangerous, it would be a good idea to avoid
getting it on your hands and to rinse it off if you do.
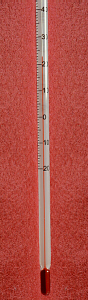
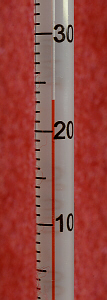
- Use a thermometer to determine
current room temperature. (For example, this thermometer is at 23.1° C.)
Set the Temperature knob to that temperature.
Record the room temperature in your lab notebook.
- With the electrode submerged in
pH 7.00 buffer far enough to include the calomel, flip the toggle switch to
Read (or pH). Since the electrode is in
pH 7.00 buffer, the indicator needle should read exactly 7.00 (If you are
looking exactly at the needle, you will not see its reflection in the mirror
behind it remember to avoid parallax error). You may need to wait a little
while for the needle to stabilize. If the reading is not 7.00, slowly turn
the Standardize knob until it is, then put the meter back on Standby. If
the calomel is not submerged, the machine will behave erratically. Always
remember to flip the toggle switch back to Standby before removing the
electrode from a solution. Failure to do so can mess up the electrode so
it doesnt give meaningful readings.
- After double checking to make sure
the machine is on Standby, gently raise the electrode out of the buffer
(note: if you do this with the machine on Read it will mess up the
electrode make sure it is on Standby). Use the squirt bottle of
dH2O to THOROUGHLY rinse off the electrode, catching the drips in
the waste beaker. Gently TOUCH/blot off the excess water (do not rub or
wipe) with a Kimwipe.
- CAREFULLY lower the electrode into a
beaker of pH 4.00 (or pH 10.00) buffer (record in your lab notebook which you
use) far enough to include the calomel. Set the meter to Read and use the
Slope knob (note: do NOT use the Standardize knob for this make sure
you use the Slope knob) to adjust the meter to the corresponding pH (4.00
or 10.00). Then, remember to put the meter back on Standby, and once again,
lift up the electrode and thoroughly rinse it and pat it dry.
- CAREFULLY lower the electrode into
your sample far enough to include the calomel (Hint: by placing your sample
in the smallest available beaker, you can use less and still maintain a
reasonable depth). Set the machine to Read (pH) and, when stable, take
your reading, remembering to interpolate the last decimal place (read
to two decimal places). Do not let the electrode hit bottom or it
will break. Set the machine back to Standby when you are done, and
remember to record your reading in your lab notebook. After setting the
machine to Standby, raise the electrode, remove your sample, position the
waste beaker under the electrode, and THOROUGHLY rinse all sample material
off the electrode into the waste beaker.
- If you have more samples to test,
repeat the previous step
for any subsequent samples. After you are finished with all your samples,
thoroughly rinse the electrode to make sure it is clean, pat it dry, then
lower the CLEAN electrode carefully into the pH 7.00 buffer for
storage. Under NO circumstances should the electrode be left in mid-air
where it will dry out. Please make sure before you leave a station that
the electrode is back in the pH 7 buffer solution.
- Clean up all spills. Leave the area
neat and dry. Claim and clean up your beakers of sample. Please do not
leave your beakers of solutions lying around for someone else to clean up and
please remember to dispose of waste properly. Make sure the waste beaker and
beakers of buffer as well as the bottle of dH2O and box of Kimwipes
are still there for the next person. Thoroughly wash all your glassware and
place in one of the drainage racks to dry. Double-check to make sure the
electrode is clean and has been placed back into the beaker of pH 7.00 buffer.
- Make sure to record all data in your
lab notebook and draw illustrations of any equipment thats new to you.
Enter the requested data on the
pH Web page
A copy of the
class data
should be included in your notebook.
Other Things to Include in Your Notebook
Make sure you have all of the following in your lab notebook:
- all handout pages (in notebook or separate protocol book)
- all notes you take during the introductory mini-lecture
- all notes and data you gather as you perform the experiment
- print-out of class data (available online)
- overall drawing (yours!) of pH meter with parts labeled
- detailed drawing (yours!) of meter face, including needle
and mirror
- detailed drawing (yours!) of temperature knob
- detailed drawing (yours!) of standardize knob
- detailed drawing (yours!) of slope knob
- detailed drawing (yours!) of toggle switch
- drawing (yours!) of combination electrode
- sample(s) of pH paper strips you used
- answers to all discussion questions, a summary/conclusion in your
own words, and any suggestions you may have
- any returned, graded pop quiz
Copyright © 2011 by J. Stein Carter. All rights reserved.
Based on printed protocol Copyright © 1980 D. B. Fankhauser
and © 1988 J. L. Stein Carter.
This page has been accessed  times since 28 Jun 2011.